この記事は現役ウェブディベロッパーがわかりやすさにこだわって作成しました
Nextcloud(NextCloud Pi)のバージョンアップのメモです。あららぼさんのサイトから引用させていただきました
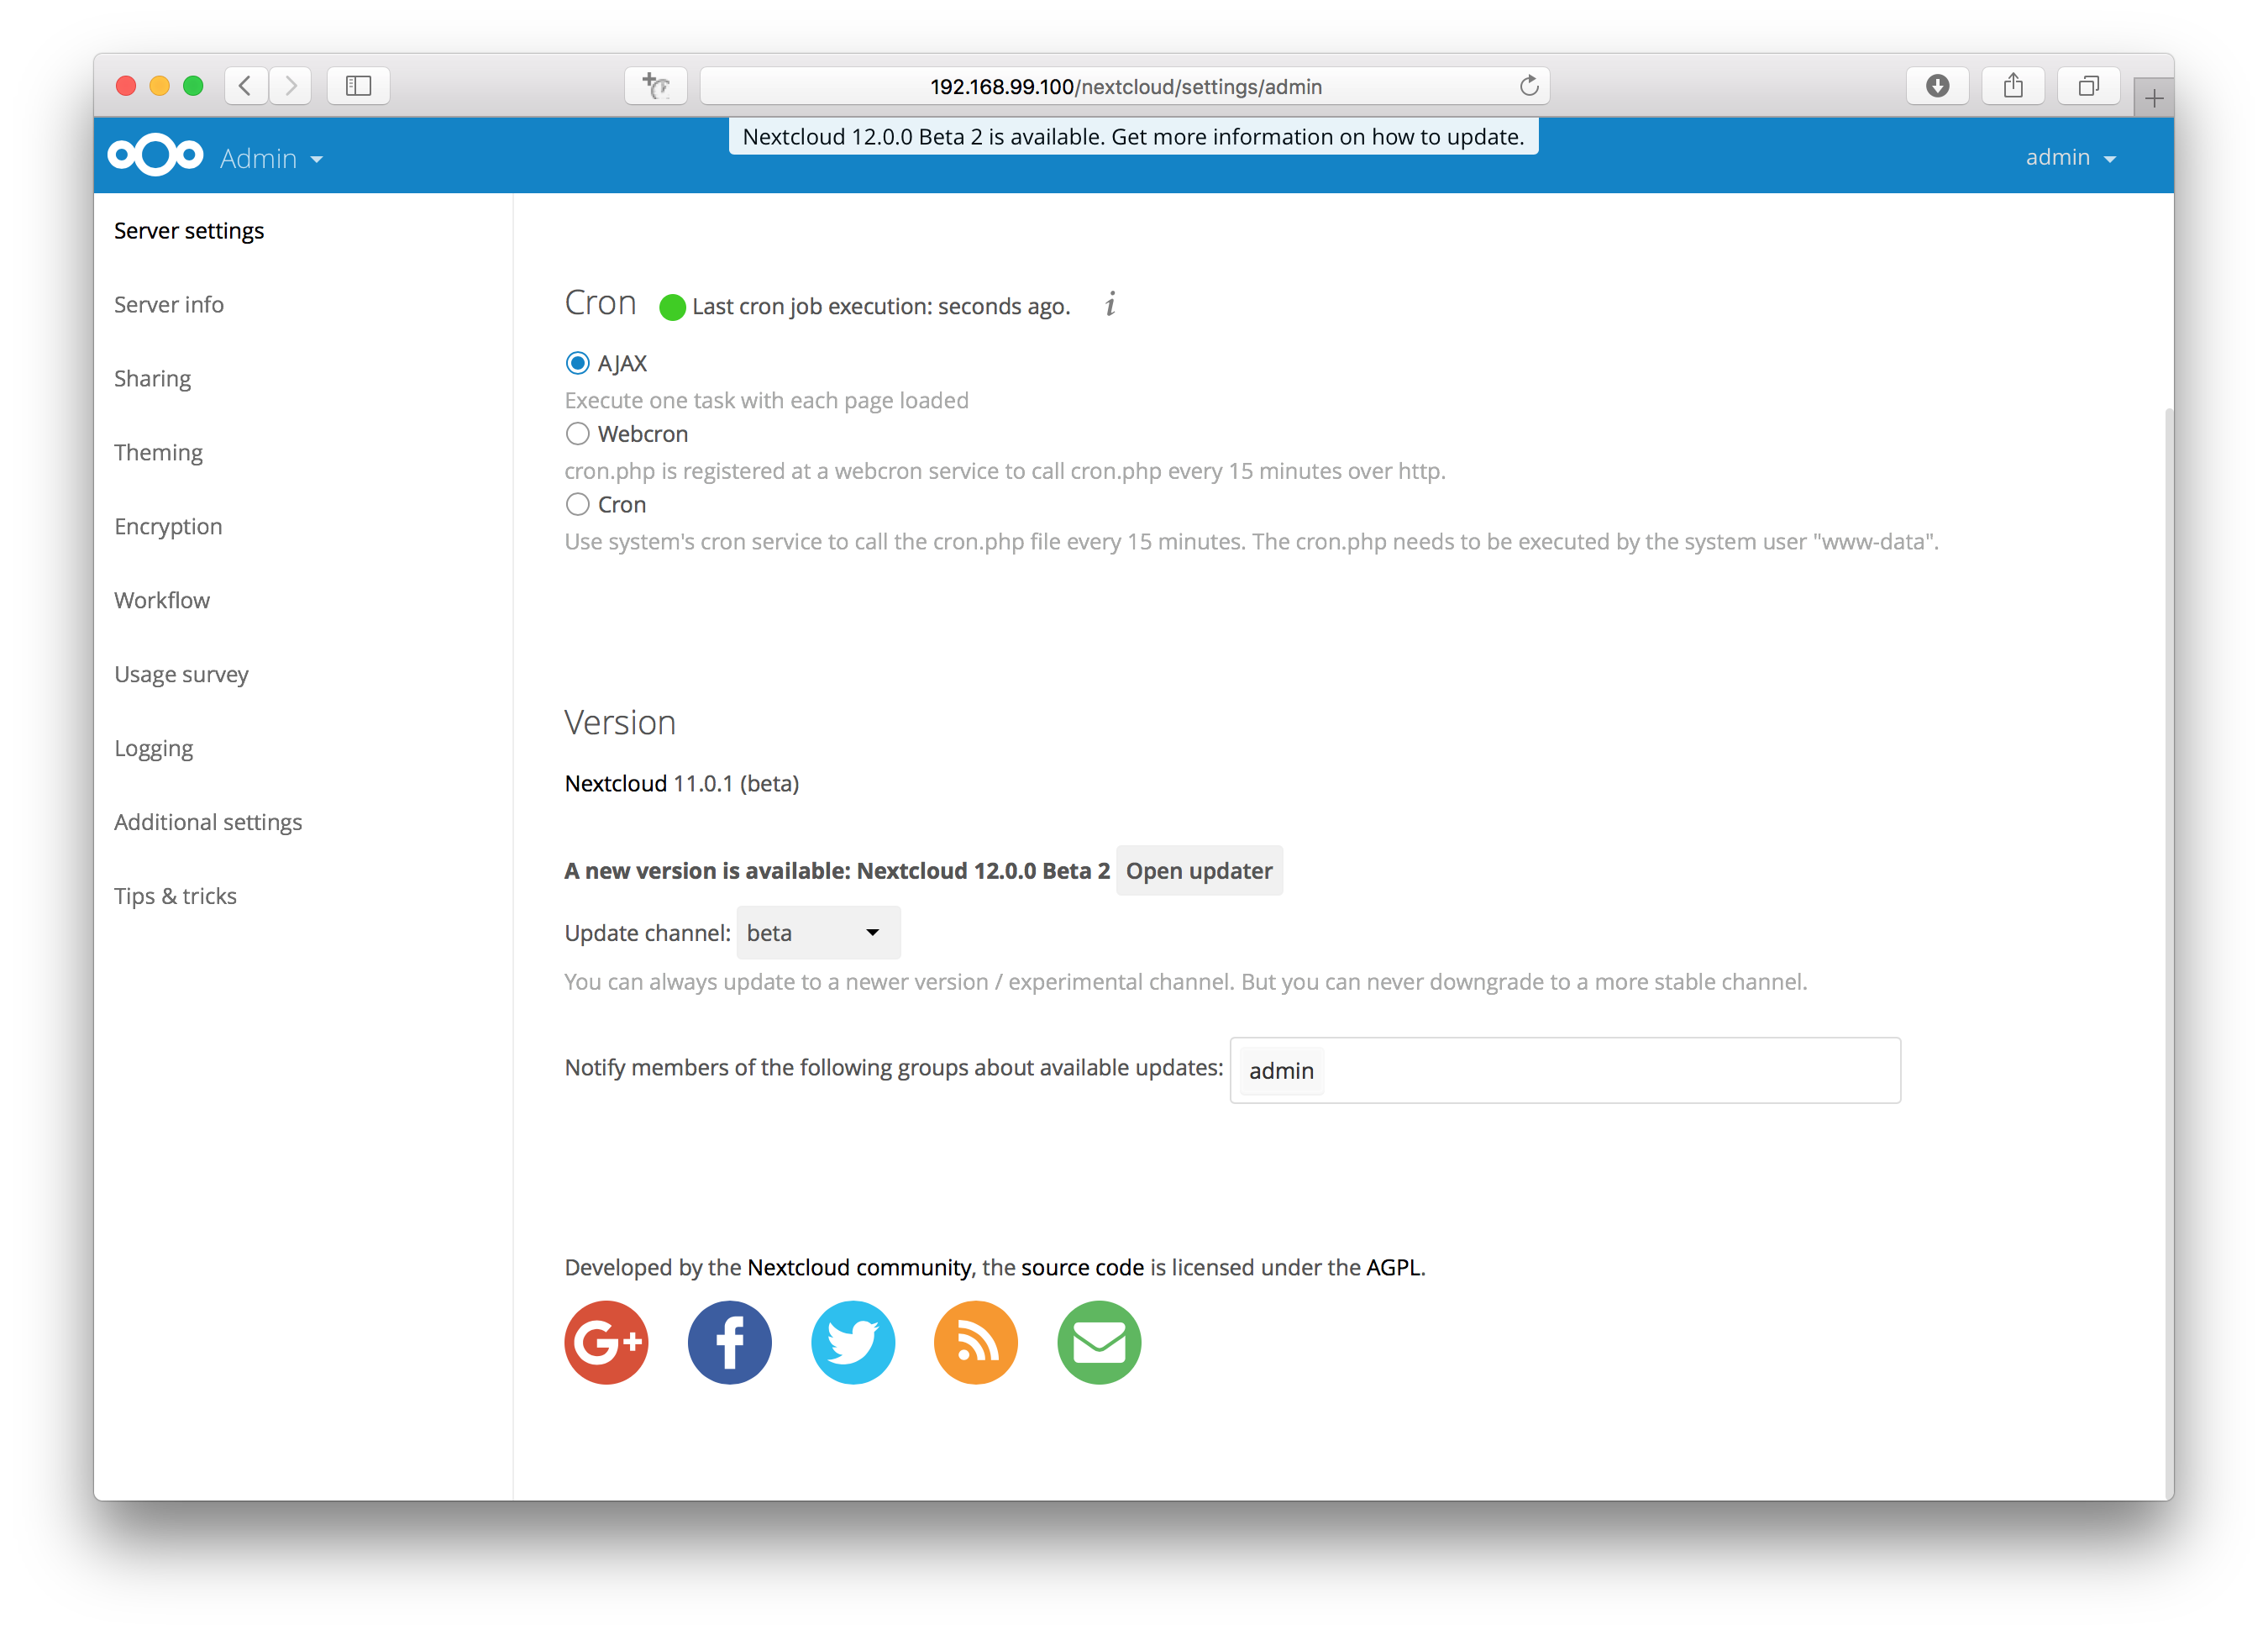
WEBから実施する場合は、画面右上の設定を選択します。左側に表示されるメニューから概要をクリックして、そこに表示されるアップデータを開くをクリックして実行します。
しかし、Conohaのレンタルサーバー上に設定した筆者の環境では失敗しました。
この場合は、CUIから行う必要があるようです。
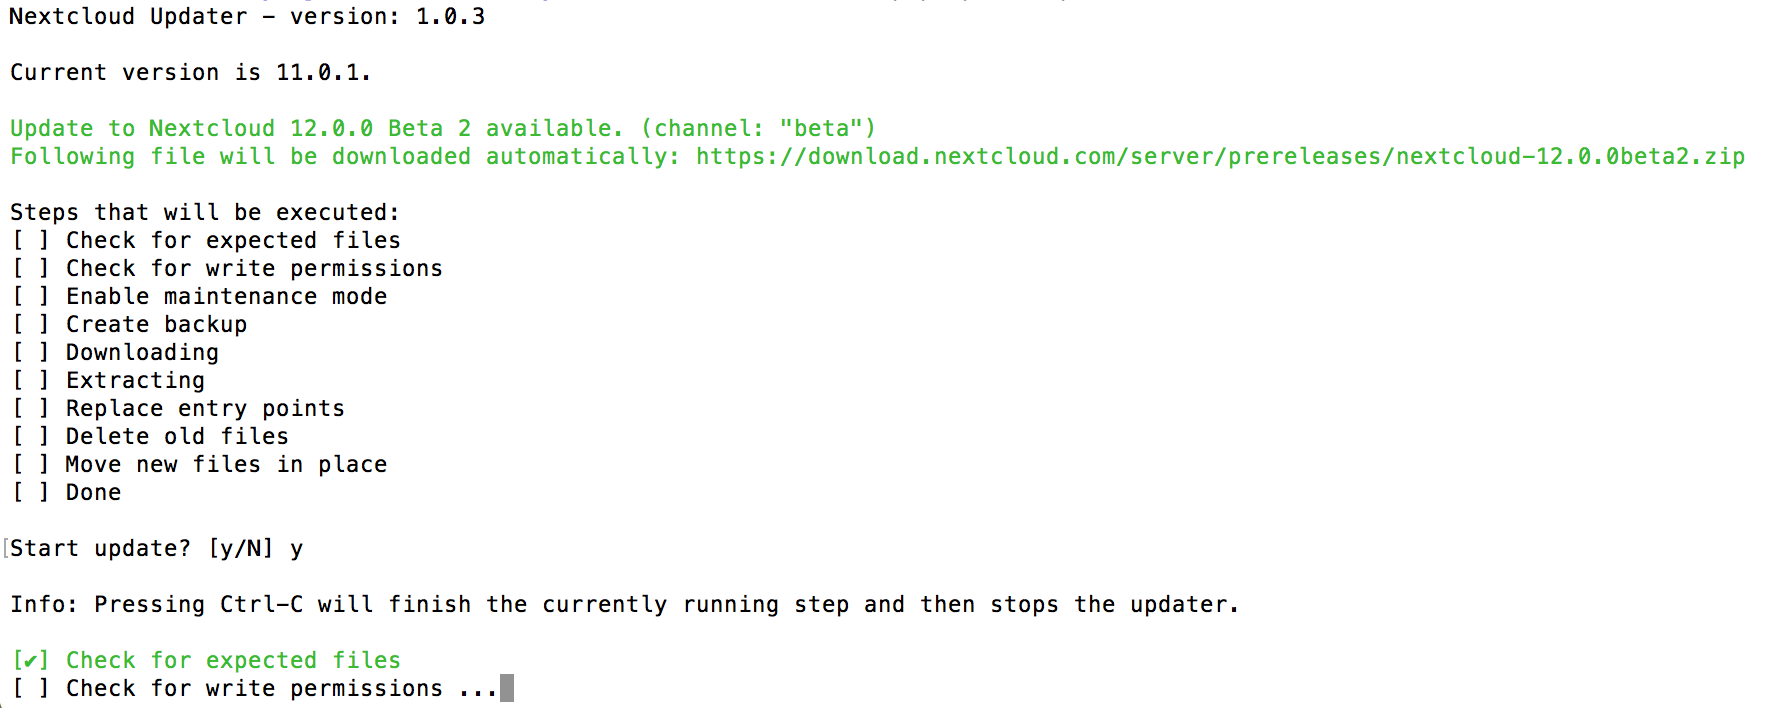
コマンドラインでアップデートスクリプトを実行してみる

GUIでうまくいかない場合はCUIで行う必要があるようです。こちらも引用させていただきました
1. いつも通りにアップデートしてみると
Webでバージョンアップするとタイムアウトで失敗するため、いつも通りCLIで実行しました。
# cd /var/www/html/nextcloud/updater/
# sudo -u nginx php updater.phar

Nextcloud Updater - version: v20.0.0beta4-11-g68fa0d4

Current version is 22.2.6.

Update to Nextcloud 23.0.3 available. (channel: "stable")
Following file will be downloaded automatically: https://download.nextcloud.com/server/releases/nextcloud-23.0.3.zip
Open changelog ?

Steps that will be executed:
[ ] Check for expected files
[ ] Check for write permissions
[ ] Create backup
[ ] Downloading
[ ] Verify integrity
[ ] Extracting
[ ] Enable maintenance mode
[ ] Replace entry points
[ ] Delete old files
[ ] Move new files in place
[ ] Done

Start update? [y/N] y
Info: Pressing Ctrl-C will finish the currently running step and then stops the updater.

[?] Check for expected files
[?] Check for write permissions
[?] Create backup
[?] Downloading
[?] Verify integrity
[?] Extracting
[?] Enable maintenance mode
[?] Replace entry points
[?] Delete old files
[?] Move new files in place
[?] Done

Update of code successful.

Should the "occ upgrade" command be executed? [Y/n] Y
Nextcloud or one of the apps require upgrade - only a limited number of commands are available
You may use your browser or the occ upgrade command to do the upgrade
2022-04-07T12:27:53+00:00 Setting log level to debug
2022-04-07T12:27:53+00:00 Repair step: Repair MySQL collation
(snip)
・
・
・

Keep maintenance mode active? [y/N] n
Nextcloud or one of the apps require upgrade - only a limited number of commands are available
You may use your browser or the occ upgrade command to do the upgrade
Maintenance mode disabled

Maintenance mode is disabled
このあとWebでログインしようとしましたが、やはり失敗しました。
2. 対処方法
occ upgradeをすれば、回避できるようなのでやってみます。
# cd /var/www/html/nextcloud/
# sudo -u nginx php occ upgrade
Nextcloud or one of the apps require upgrade - only a limited number of commands are available
You may use your browser or the occ upgrade command to do the upgrade
Setting log level to debug
Updating database schema
Updated database
Starting code integrity check...
Finished code integrity check
Update successful
Maintenance mode is kept active
Resetting log level
メンテナンスモード状態のため、以下で解除。
# sudo -u nginx php occ maintenance:mode --off
これでWebでログインできるようになりました。
3. セキュリティ&セットアップ警告の消し込み
Nextcloud 23.0.4 にアップデートした時に出たものです。
- The PHP OPcache module is not properly configured. See the documentation ↗ for more information.
The OPcache interned strings buffer is nearly full. To assure that repeating strings can be effectively cached, it is recommended to apply opcache.interned_strings_buffer to your PHP configuration with a value higher than 8.
→ひとまず2倍にしました。 # vi /etc/php.d/10-opcache.ini opcache.interned_strings_buffer=8 ↓ opcache.interned_strings_buffer=16
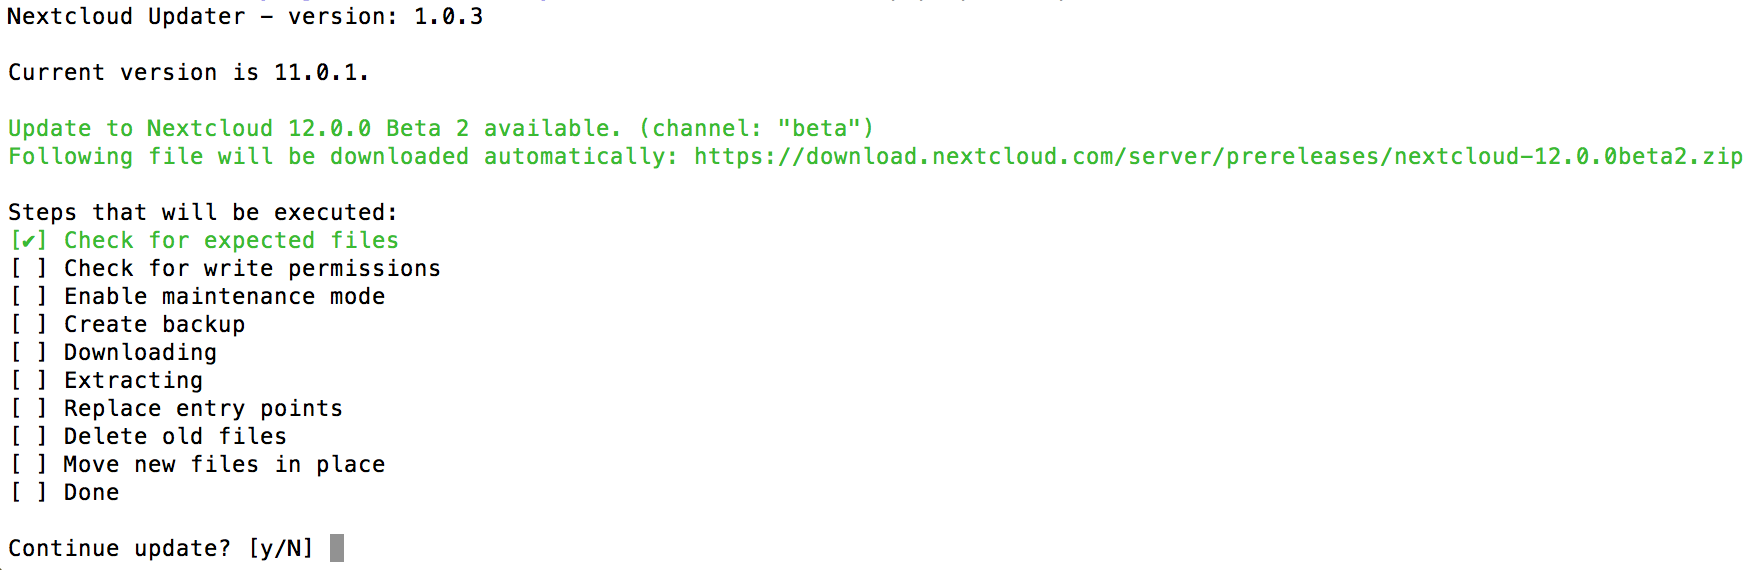
Using the command line based updater
翻訳する時間がなくて公式マニュアルからそのまま引用させていただきました!
The command line based updater works in the exact same way the web based updater works. The steps and checks are the very same.
Warning
APCu is disabled by default on CLI which could cause issues with nextcloud’s command line based updater. Please make sure you set the apc.enable_cli to 1 on your php.ini config file or append --define apc.enable_cli=1 to the command line based updater call (like sudo -u www-data php --define apc.enable_cli=1 /var/www/nextcloud/updater/updater.phar).
The steps are basically the same as for the web based updater:
- You should see a notification at the top of any Nextcloud page when there is a new update available. Go to the admin settings page and scroll to the section “Version”. This section has a button to open the updater. This section as well as the update notification is only available if the update notication app is enabled in the apps management.
- Instead of clicking that button you can now invoke the command line based updater by going into the updater/ directory in the Nextcloud directory and executing the updater.phar as the web server user.
sudo -u www-data php /var/www/nextcloud/updater/updater.phar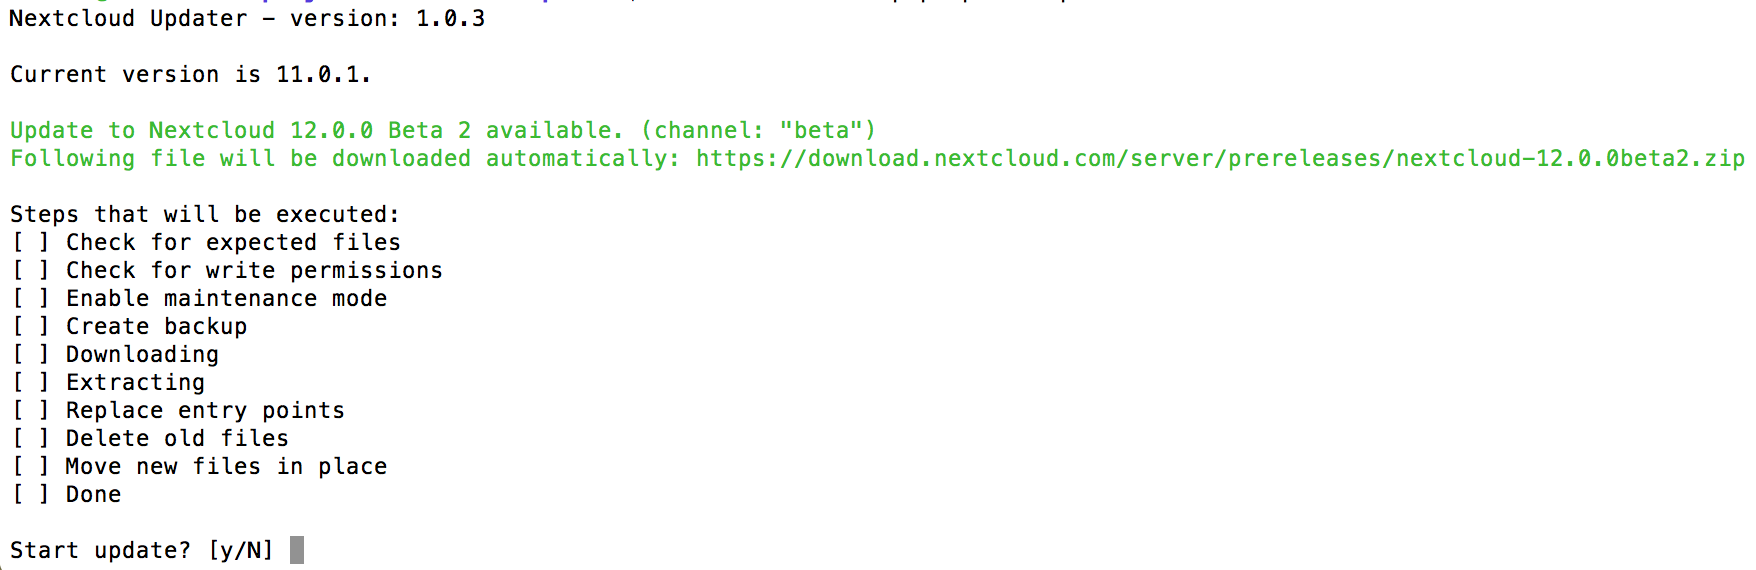
- Verify the information that is shown and enter “Y” to start the update.
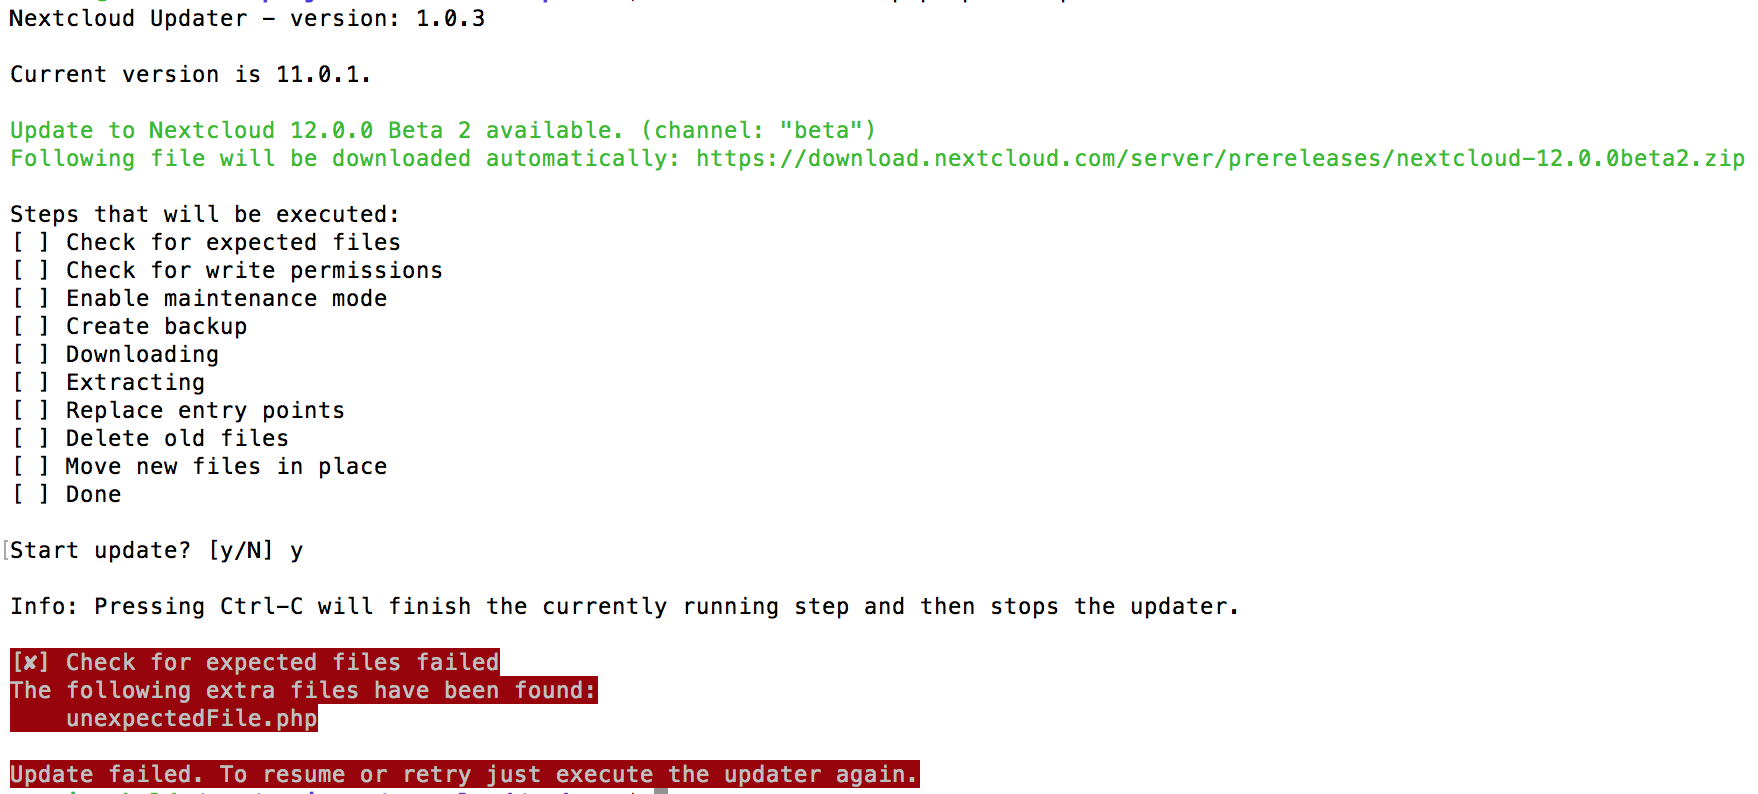
- In case an error happens or the check failed the updater stops processing and gives feedback. You can now try to solve the problem and re-run the updater command. This will continue the update and re-run the failed step. It will not re-run the previous succeeded steps.
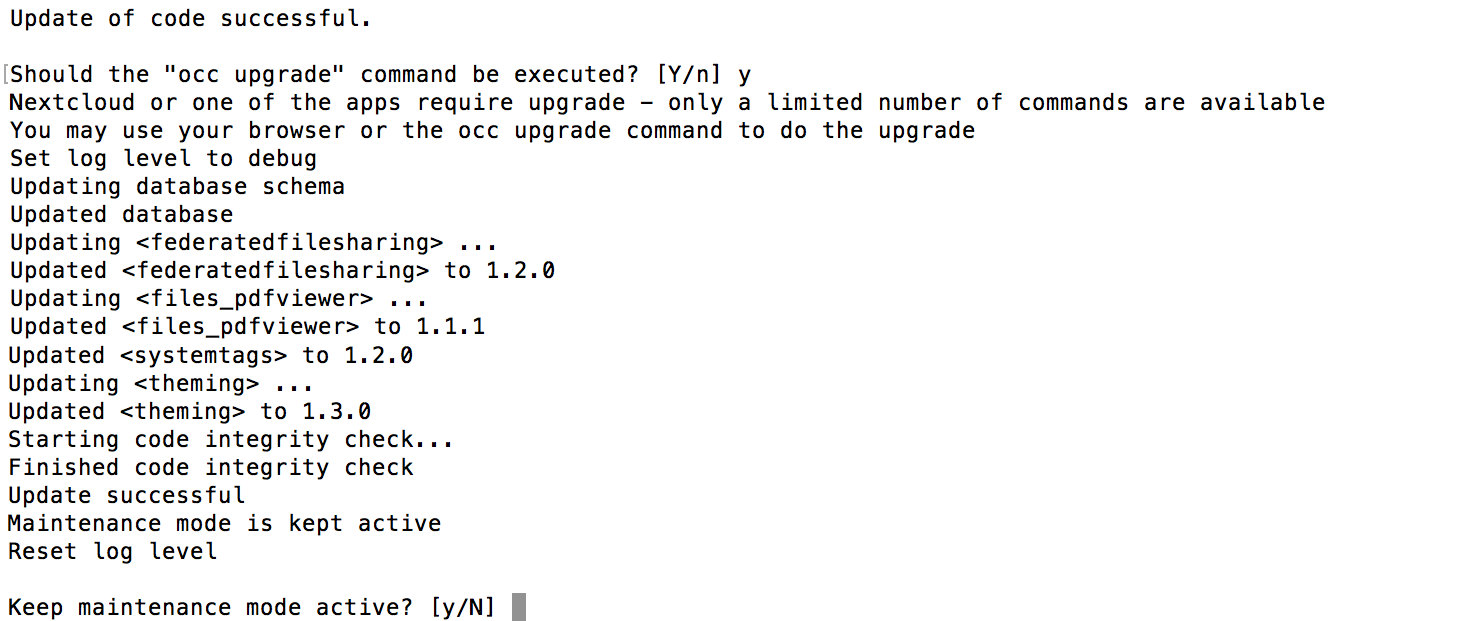
- Once all steps are executed the updater will ask you a final question: “Should the “occ upgrade” command be executed?”. This allows you to directly execute the command line based upgrade procedure (
occ upgrade). If you select “No” then it will finish with Please now execute “./occ upgrade” to finish the upgrade..
sudo php occ upgrade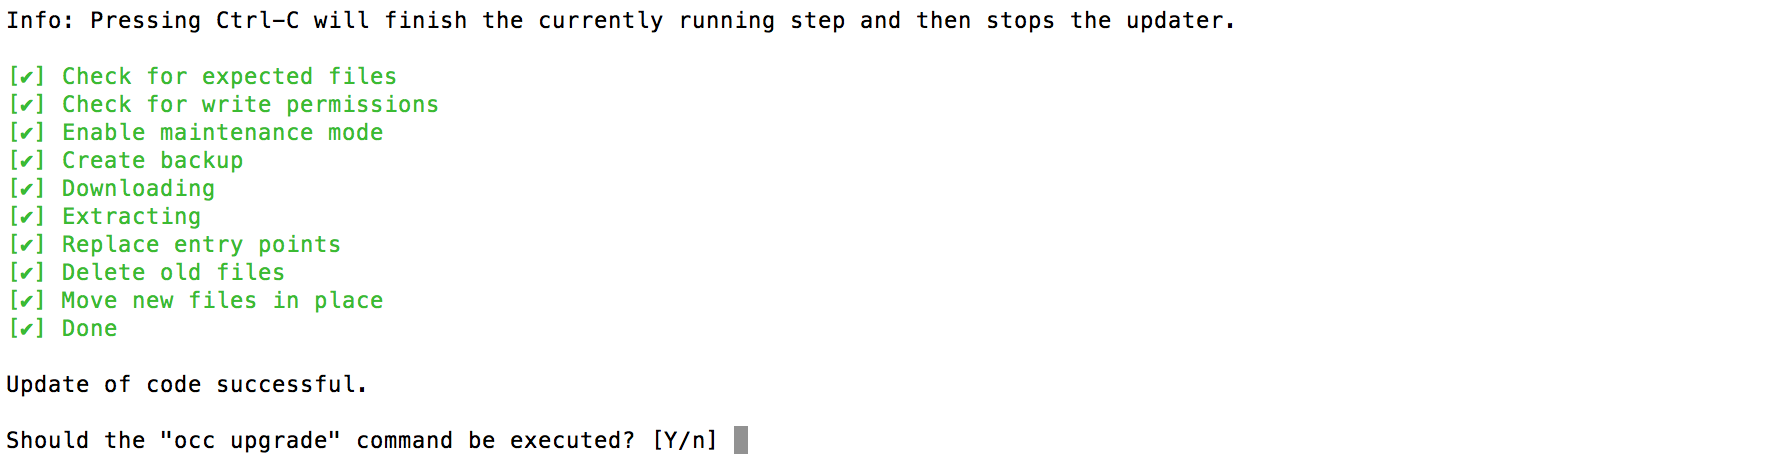
- Once the
occ upgradeis done you get asked if the maintenance mode should be kept active.
マニュアルで最新バージョンにアップデートする
こちらも公式マニュアルからそのまま引用させていただきました!

Always start by making a fresh backup and disabling all 3rd party apps.
- Back up your existing Nextcloud Server database, data directory, and
config.phpfile. (See Backup, for restore information see Restoring backup) - Download and unpack the latest Nextcloud Server release (Archive file) from nextcloud.com/install/ into an empty directory outside of your current installation. NoteTo unpack your new tarball, run: unzip nextcloud-[version].zip or tar -xjf nextcloud-[version].tar.bz2
- Stop your Web server.
- In case you are running a cron-job for nextcloud’s house-keeping disable it by commenting the entry in the crontab file
crontab -u www-data -e
(Put a # at the beginning of the corresponding line.) - Rename your current Nextcloud directory, for example
nextcloud-old. - Unpacking the new archive creates a new
nextclouddirectory populated with your new server files. Move this directory and its contents to the original location of your old server. For example/var/www/, so that once again you have/var/www/nextcloud. - Copy the
config/config.phpfile from your old Nextcloud directory to your new Nextcloud directory. - If you keep your
data/directory in yournextcloud/directory, copy it from your old version of Nextcloud to your newnextcloud/. If you keep it outside ofnextcloud/then you don’t have to do anything with it, because its location is configured in your originalconfig.php, and none of the upgrade steps touch it. - If you are using 3rd party application, it may not always be available in your upgraded/new Nextcloud instance. To check this, compare a list of the apps in the new
nextcloud/apps/folder to a list of the of the apps in your backed-up/oldnextcloud/apps/folder. If you find 3rd party apps in the old folder that needs to be in the new/upgraded instance, simply copy them over and ensure the permissions are set up as shown below. - If you are using 3rd party theme make sure to copy it from your
themes/directory to your new one. It is possible you will have to make some modifications to it after the upgrade. - Adjust file ownership and permissions:
chown -R www-data:www-data nextcloud
find nextcloud/ -type d -exec chmod 755 {} \;
find nextcloud/ -type f -exec chmod 644 {} \;- Restart your Web server.
- Now launch the upgrade from the command line using
occ, like this example on Ubuntu Linux:
(!) this MUST be executed from within your nextcloud installation directory
sudo -u www-data php occ upgrade- The upgrade operation takes a few minutes to a few hours, depending on the size of your installation. When it is finished you will see a success message, or an error message that will tell where it went wrong.
- Reenable the nextcloud cron-job. (See step 4 above.)
crontab -u www-data -e
(Delete the # at the beginning of the corresponding line in the crontab file.)
Login and take a look at the bottom of your Admin page to verify the version number. Check your other settings to make sure they’re correct. Go to the Apps page and review the core apps to make sure the right ones are enabled. Re-enable your third-party apps.
PHPのメモリ制限の警告が表示される場合の対応
アップデータ時にPHPのエラーまたは警告が表示されることがあります。phpのメモリ制限が512MBを下回る場合は警告は表示されるようです。
筆者は以下の設定をしました
memory_limit = 1024M
post_max_size = 896M
upload_max_filesize = 768M
この記事についてのご質問またはお困りのことがございましたら、お気軽にお問い合わせください。