この記事は現役ウェブディベロッパーがわかりやすさにこだわって作成しました
Shopifyでオンラインストアを構築する
Printfulにオンラインストアのサービスはありません。PrintfulはECサイトと連携して、お客様からオーダーにより商品を製造および発送業務を代行します。ここではShopify(ECサイトのプラットフォーム)で構築したオンラインストアと連携する方法をご紹介します。
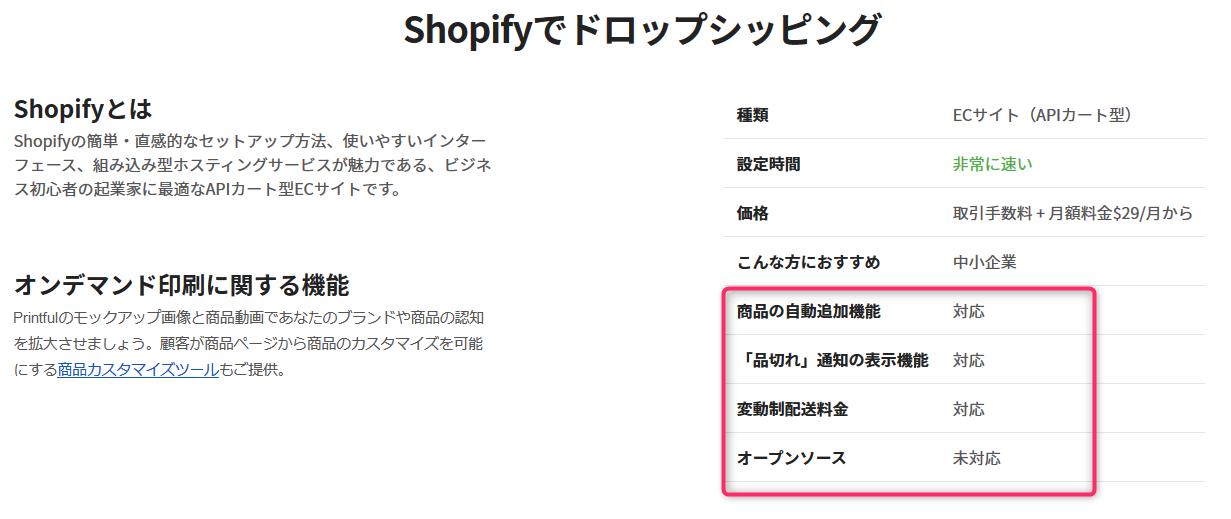
PrintfulをShopifyで利用するメリットは、Printufulで連携できる完全日本語対応のECサイトプラットフォームの中で、Shopifyが唯一、変動制配送料金を含むPrintfulのすべての機能が利用できる点です。
![](https://blogdeoshiete.com/wp-content/uploads/2020-11-13_18h06_03.png)
Shopifyアカウント作成
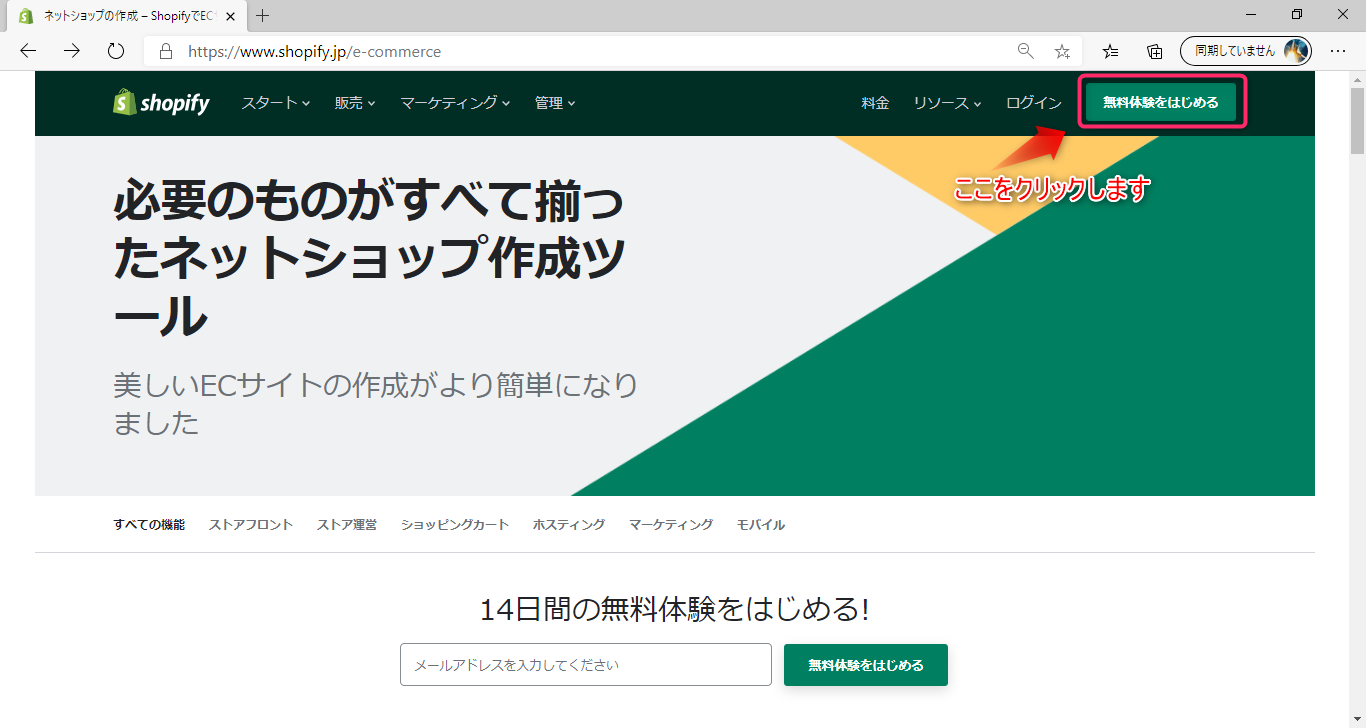
ShopifyのURLをクリックしてサイトを表示します。
![](https://blogdeoshiete.com/wp-content/uploads/cocoon-resources/blog-card-cache/1d29c6b578a02213871f345a176d4da3.png)
画面右上の「無料体験をはじめる」をクリックします。
![](https://blogdeoshiete.com/wp-content/uploads/2020-11-13_19h23_05.png)
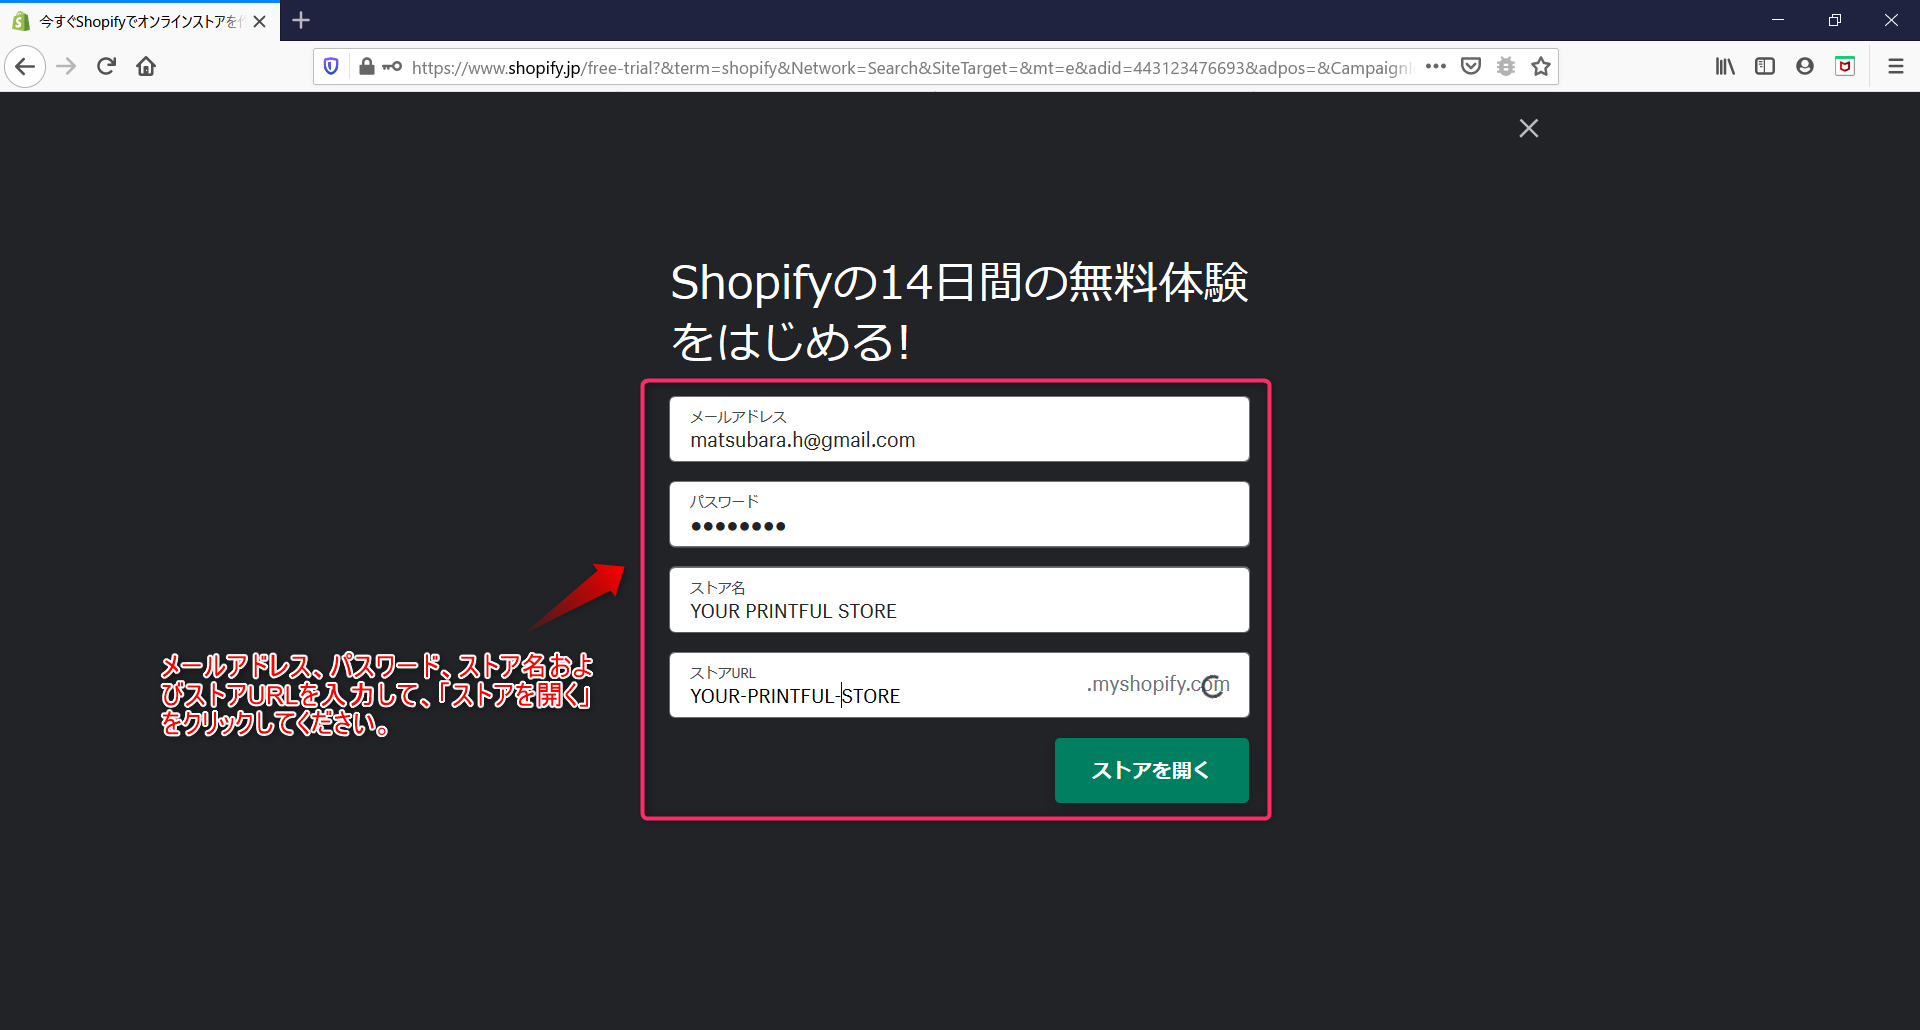
メールアドレス、パスワード、ストア名およびストアURLを入力した後、「ストアを開く」をクリックします。
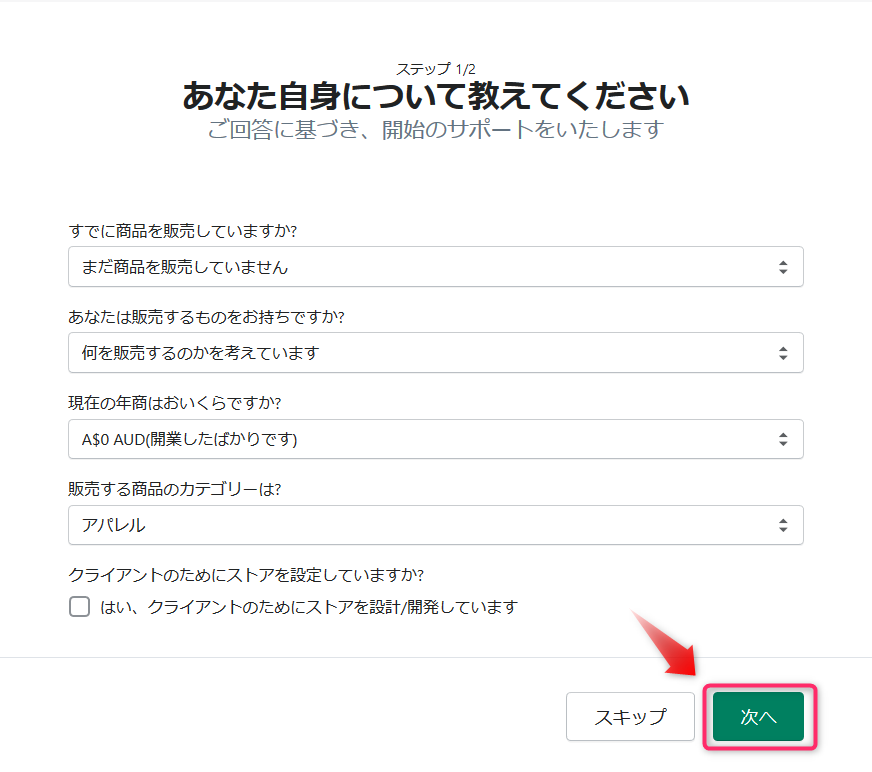
![](https://blogdeoshiete.com/wp-content/uploads/2020-11-13_16h08_22.png)
Shopifyからの質問に回答します。
![](https://blogdeoshiete.com/wp-content/uploads/2020-11-13_16h11_11.png)
ストア情報を入力します。
![](https://blogdeoshiete.com/wp-content/uploads/2020-11-13_16h10_45.png)
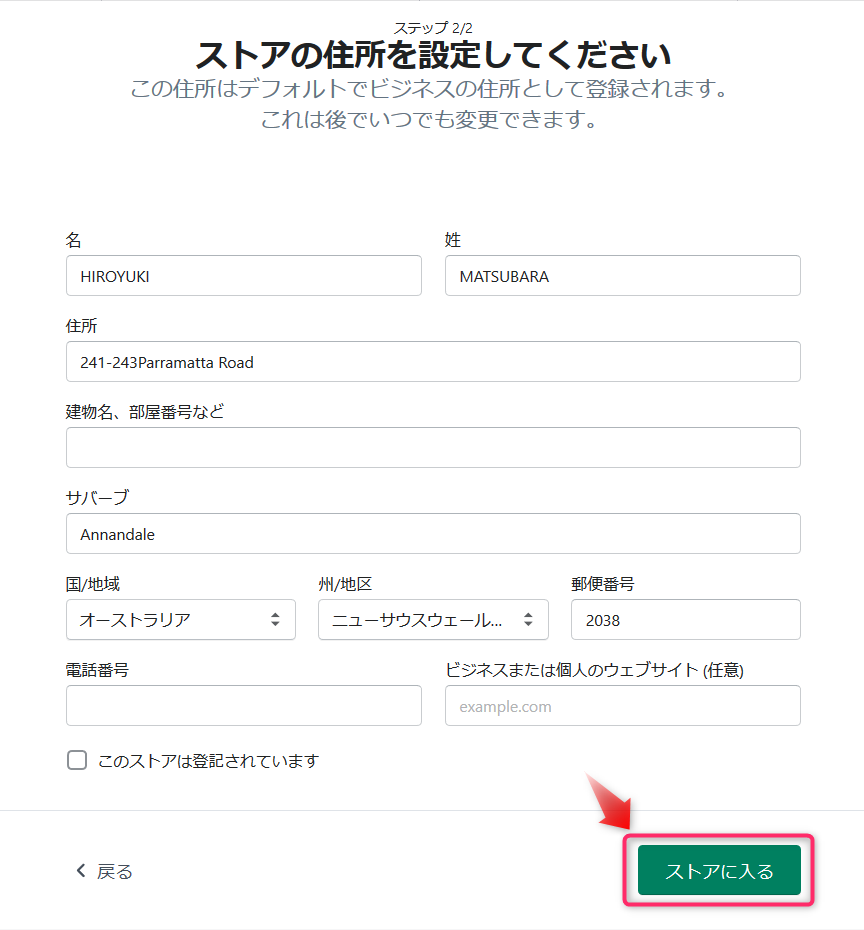
「ストアに入る」ボタンをクリックします。
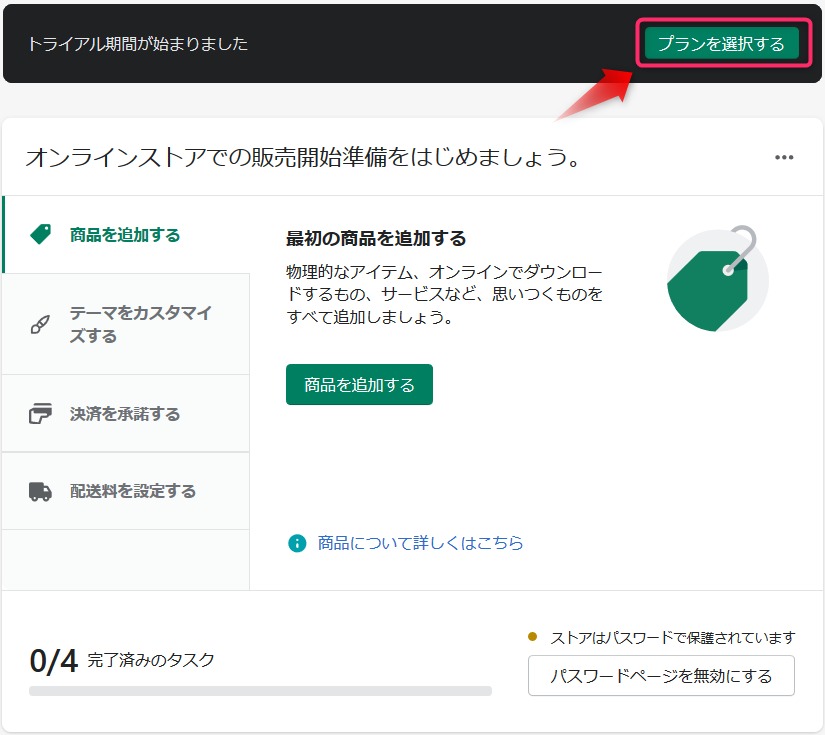
プラン選択(トライアル)
この時点ではまだプランが選択されていないためトライアルでできることは制限されています。「プランを選択する」ボタンをクリックして、プランを選択してください。
もちろんトライアル期間中はShopifyから請求されることはありません。トライアル期間中のみ利用したい方は、トライアル期間中に必ず解約してください。
![](https://blogdeoshiete.com/wp-content/uploads/2020-11-13_16h12_05.png)
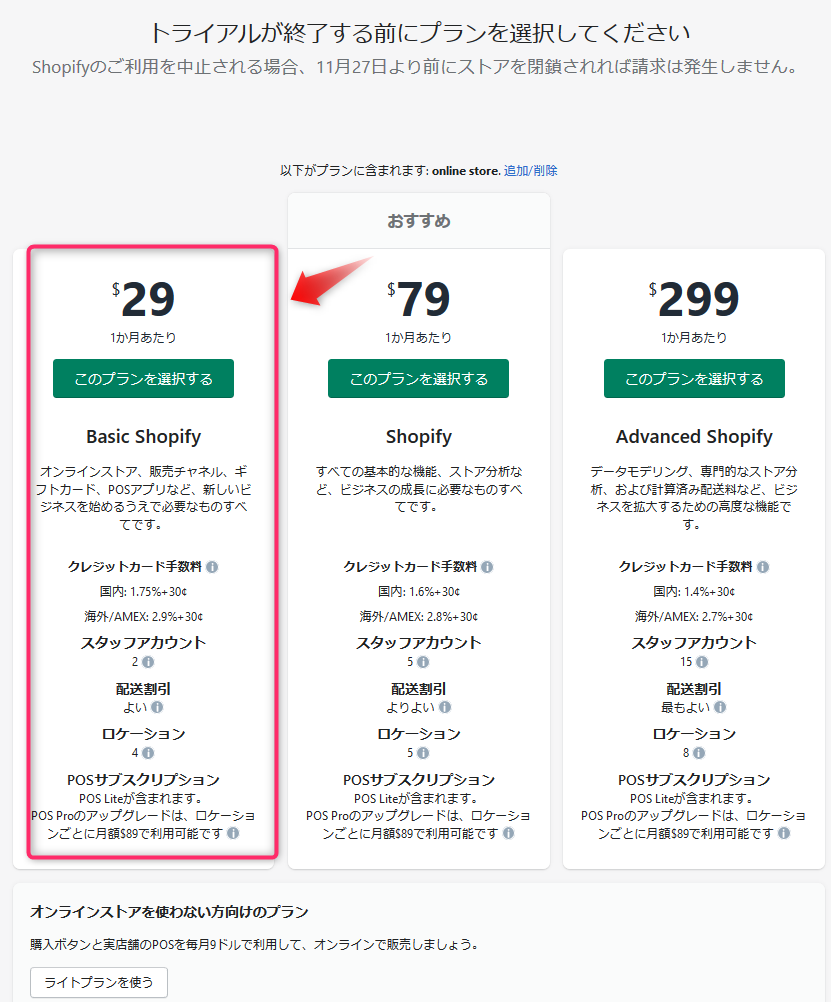
はじめての方は「ベーシックプラン」を選択します
![](https://blogdeoshiete.com/wp-content/uploads/2020-11-13_16h13_07.png)
請求サイクルは30日ごとを選択します。
決済方法はクレジットカードまたはPaypalを選択して、カード情報またはpaypal情報を入力します。
トライアルが終了するとしてここで指定したプランと請求サイクルで初回の請求が発生します。
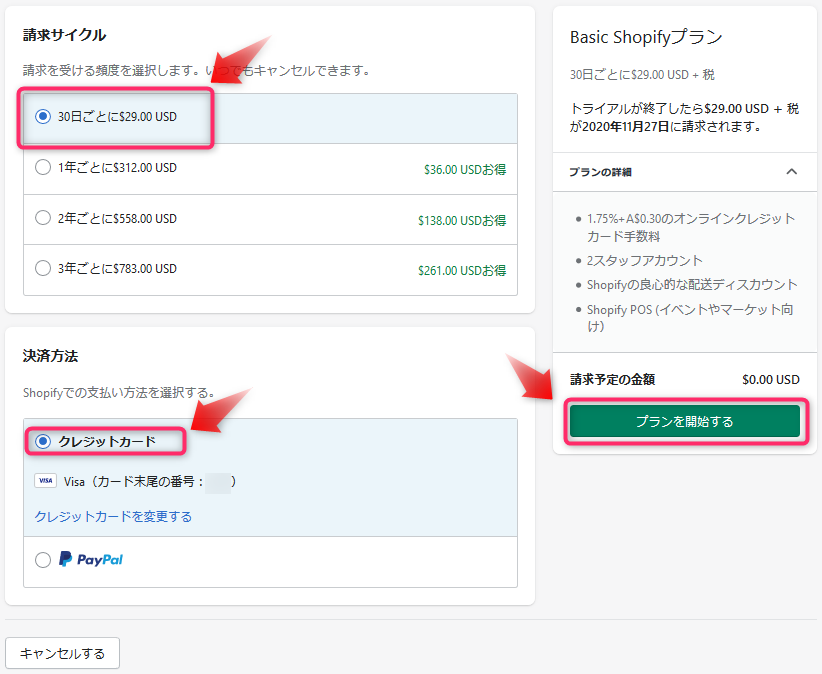
![](https://blogdeoshiete.com/wp-content/uploads/2020-11-13_16h16_52.png)
「プランを開始する」をクリックします
Printfulアドオンアプリのインストールと連携
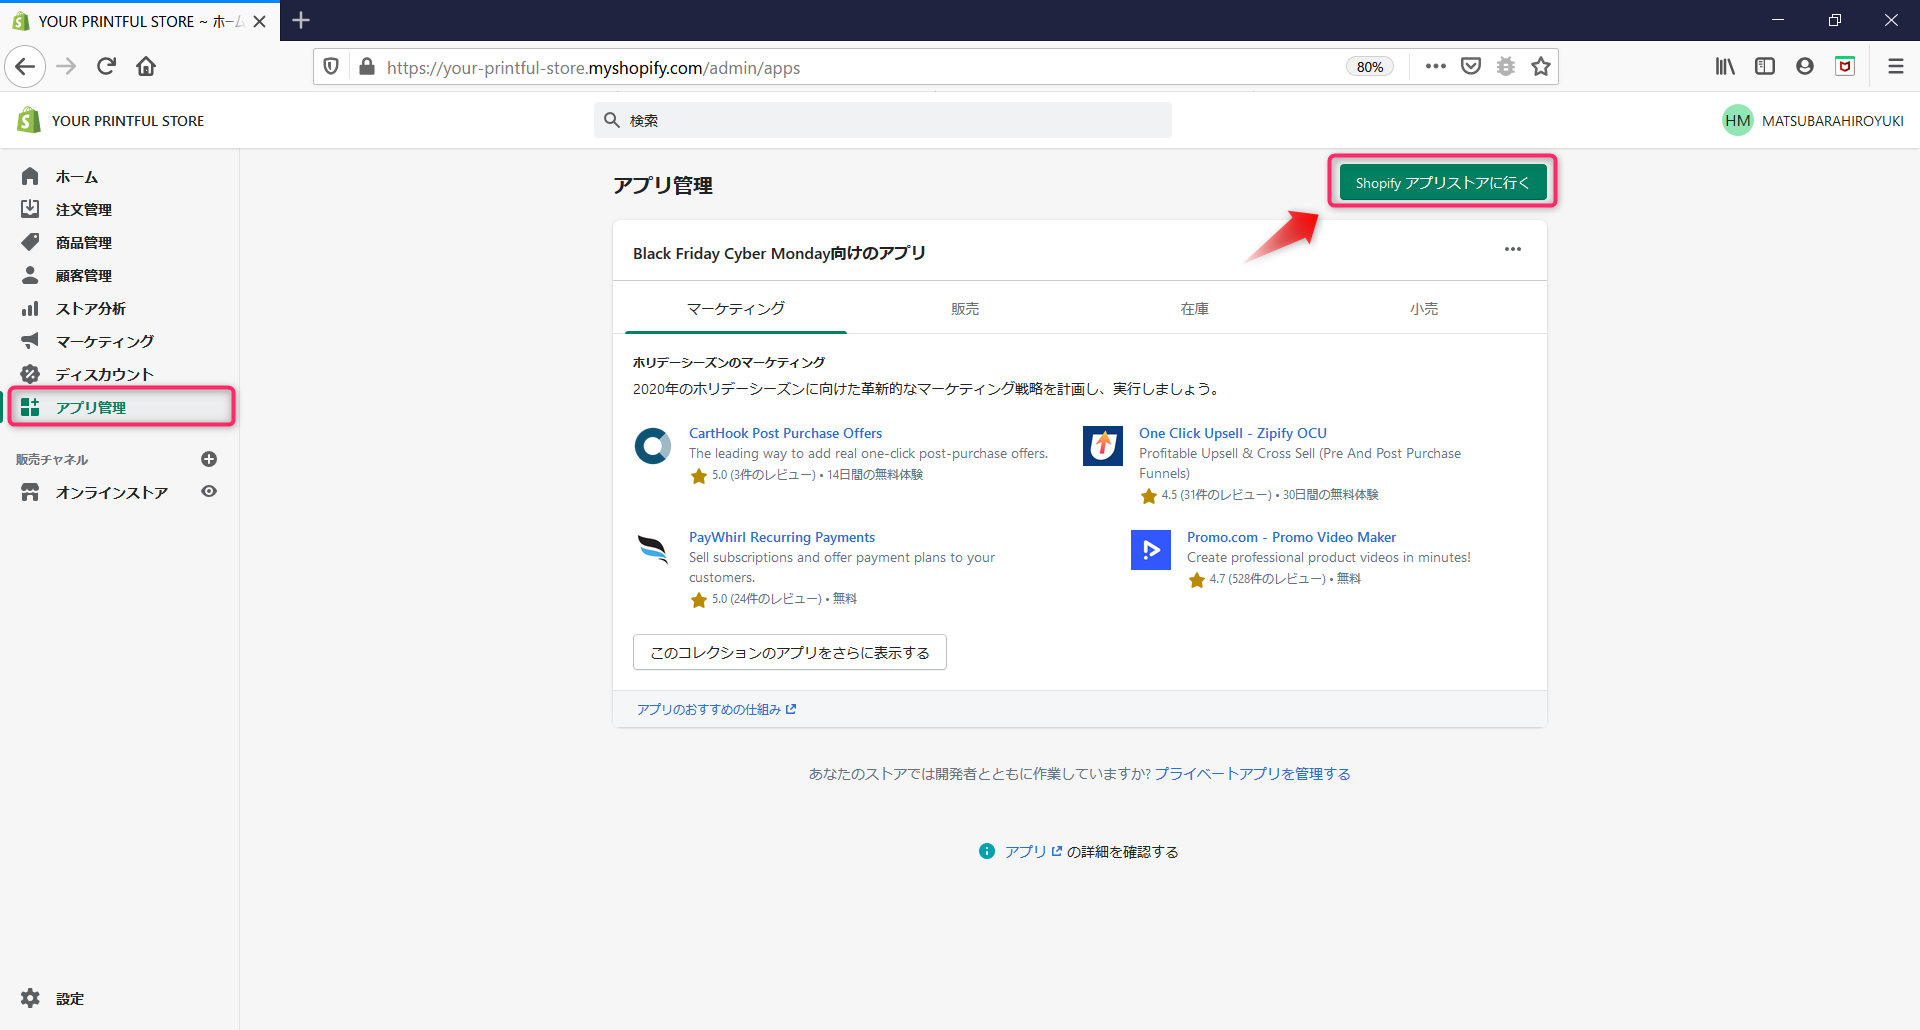
Shopify管理画面からアプリ管理を表示します。
画面右上の「Shopifyアプリストアへ行く」をクリックします。
![](https://blogdeoshiete.com/wp-content/uploads/2020-11-13_16h20_09.png)
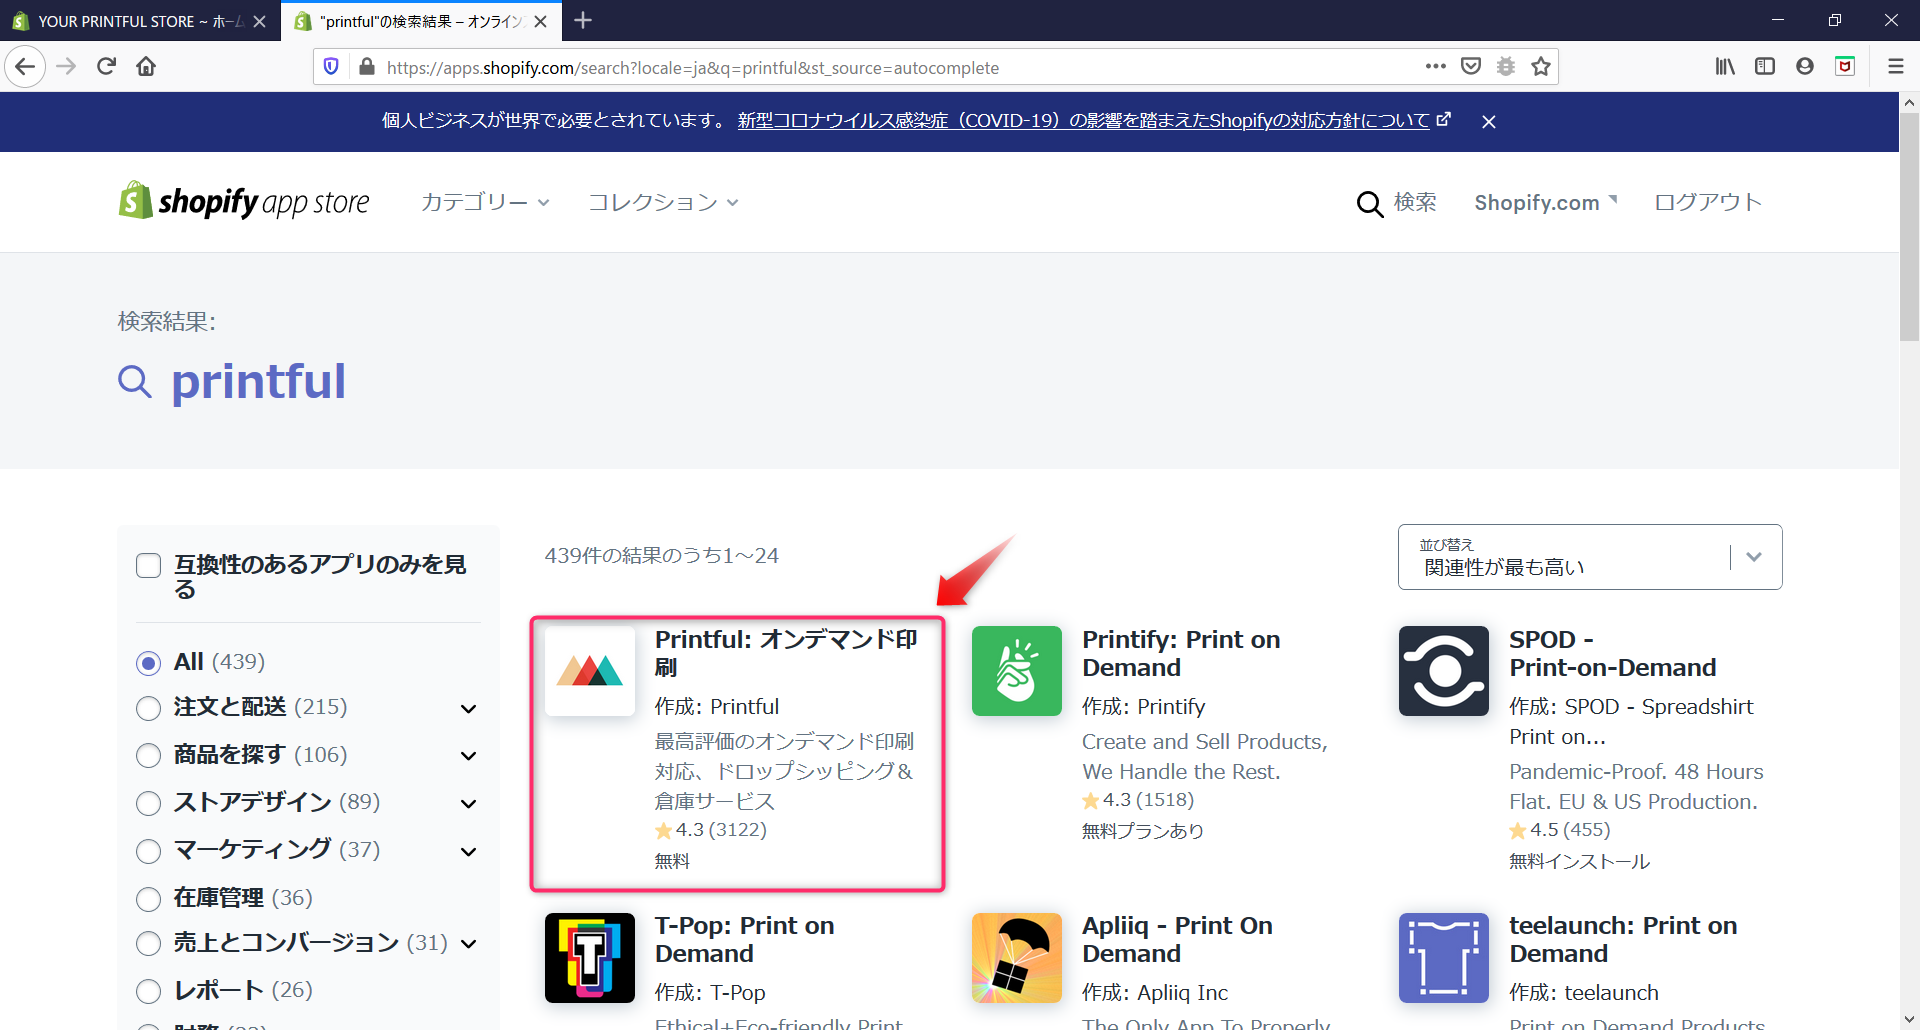
Shopifyアプリの検索画面で「printful」を検索します。Printful:オンデマンド印刷が表示されましたら、クリックします。
![](https://blogdeoshiete.com/wp-content/uploads/2020-11-13_16h21_01.png)
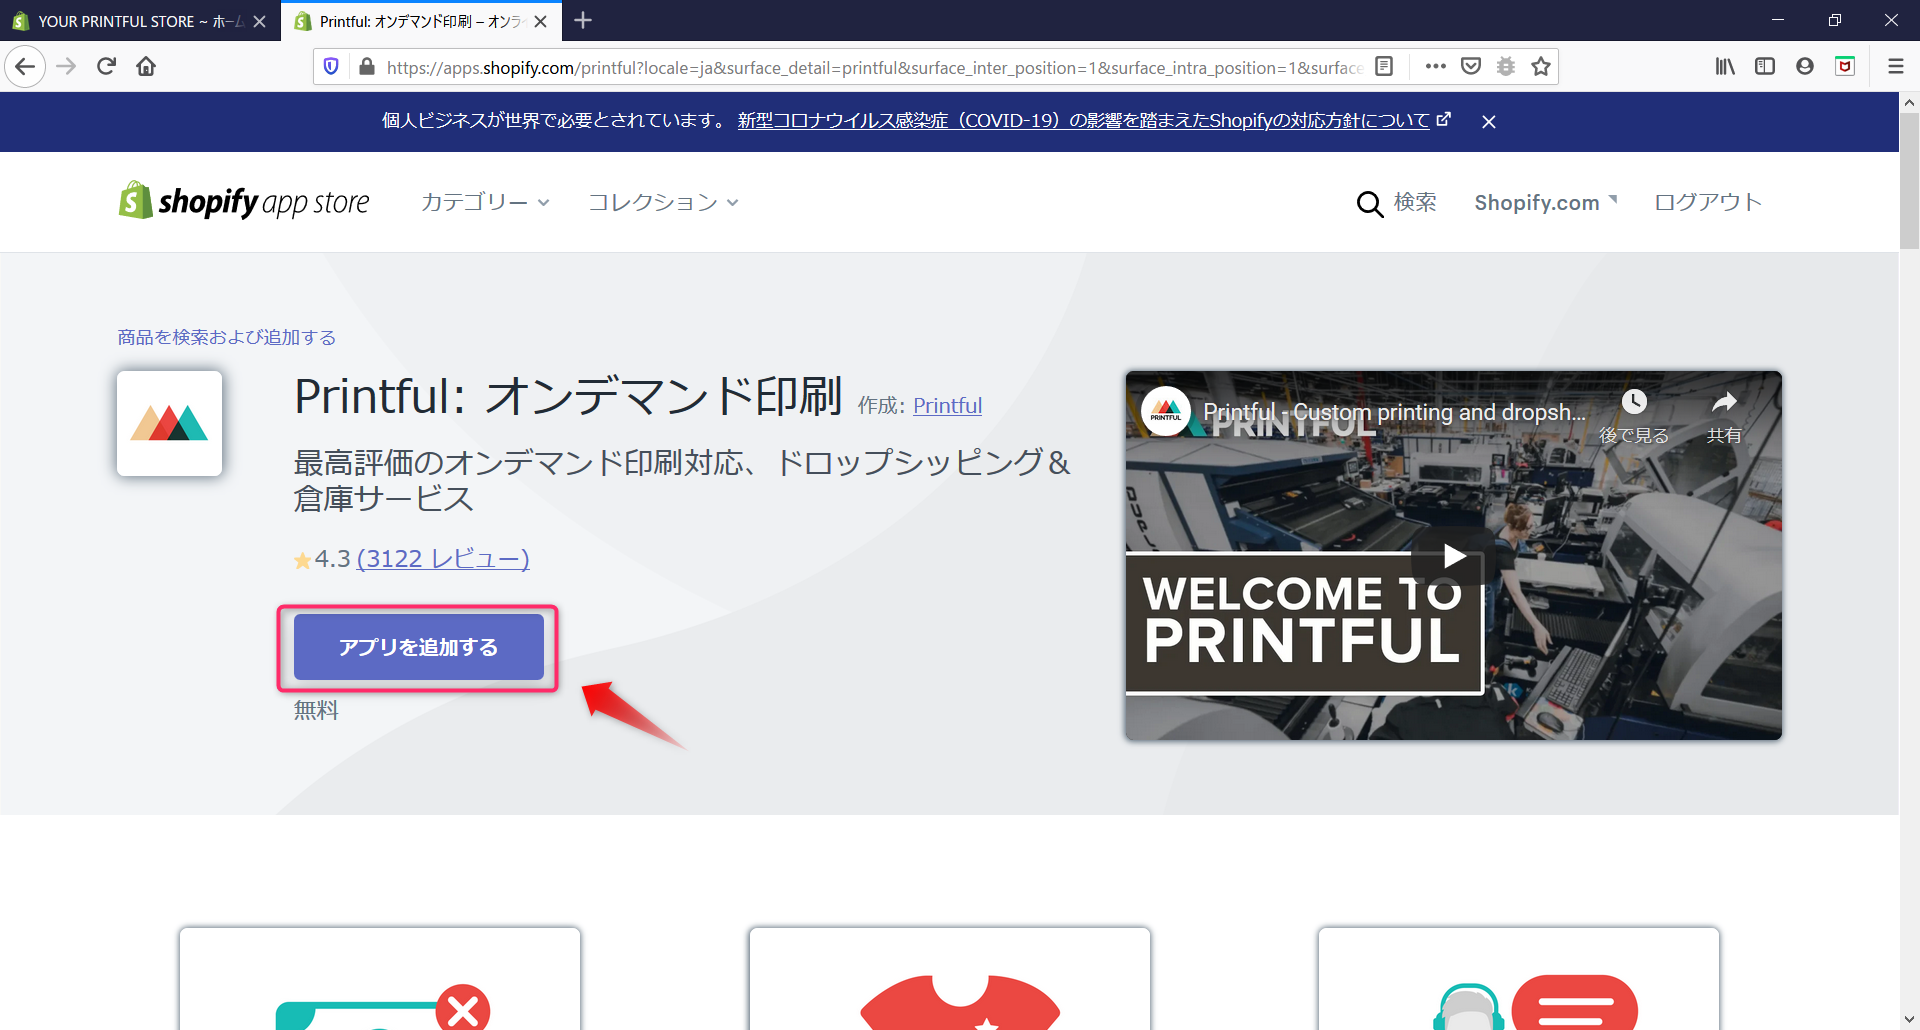
「アプリを追加する」ボタンをクリックします。
![](https://blogdeoshiete.com/wp-content/uploads/2020-11-13_16h21_13.png)
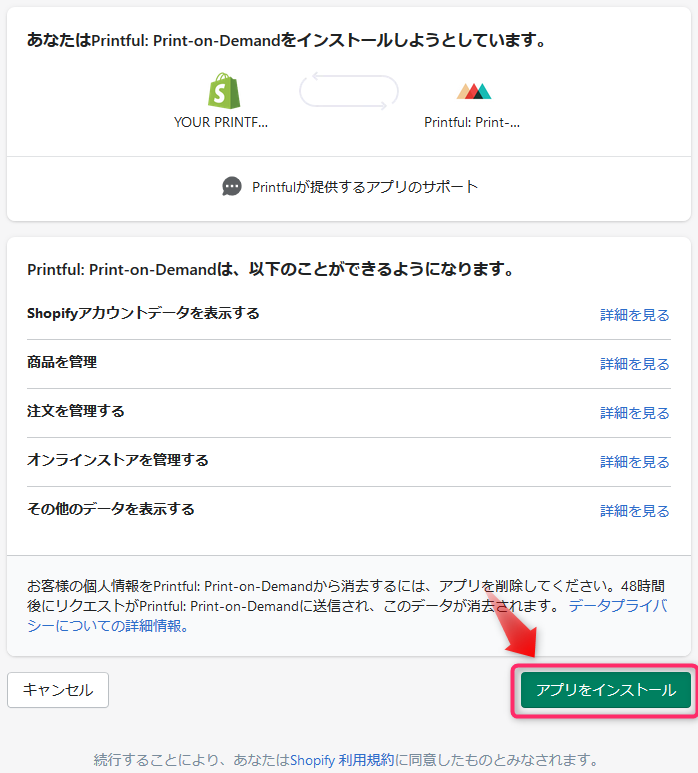
以下のような画面が表示されますので「アプリをインストールする」をクリックします。
![](https://blogdeoshiete.com/wp-content/uploads/2020-11-13_16h21_49.png)
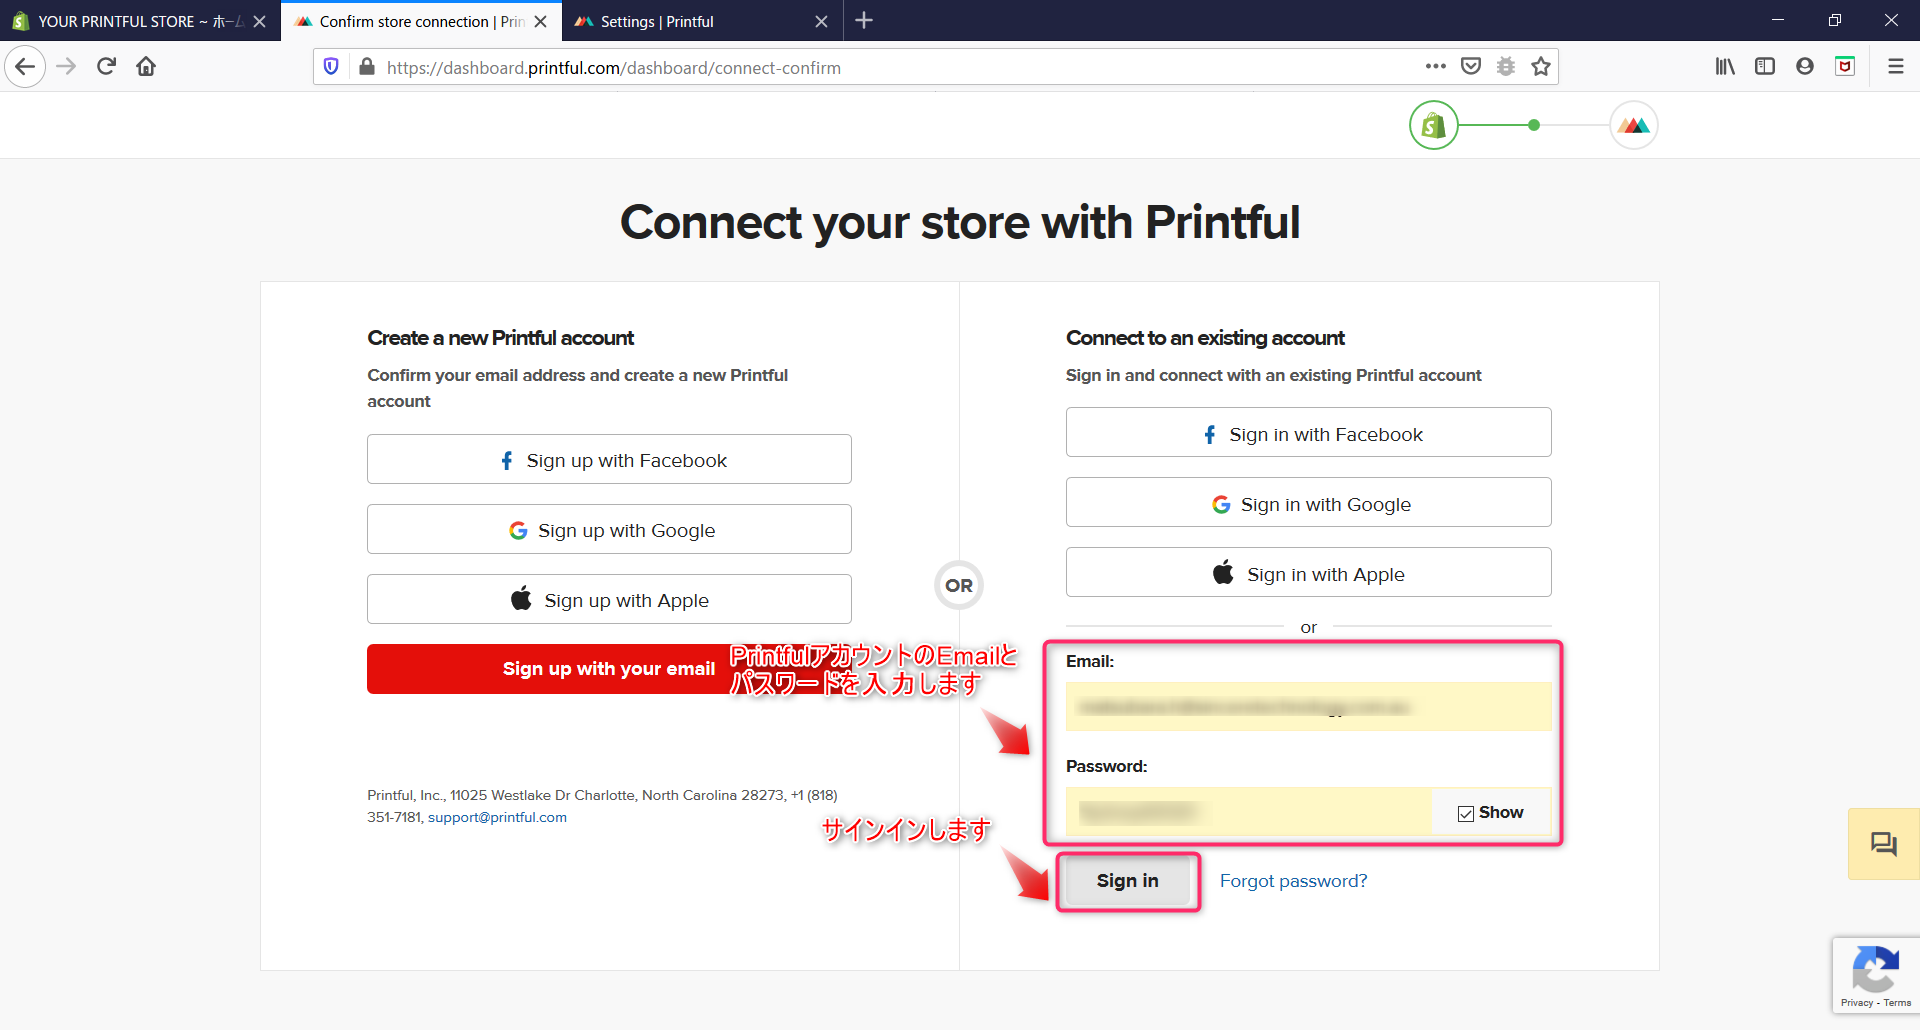
PrintfulのID(EMAIL)をパスワードを入力して、「Sign in」ボタンをクリックします。
![](https://blogdeoshiete.com/wp-content/uploads/2020-11-13_16h23_38.png)
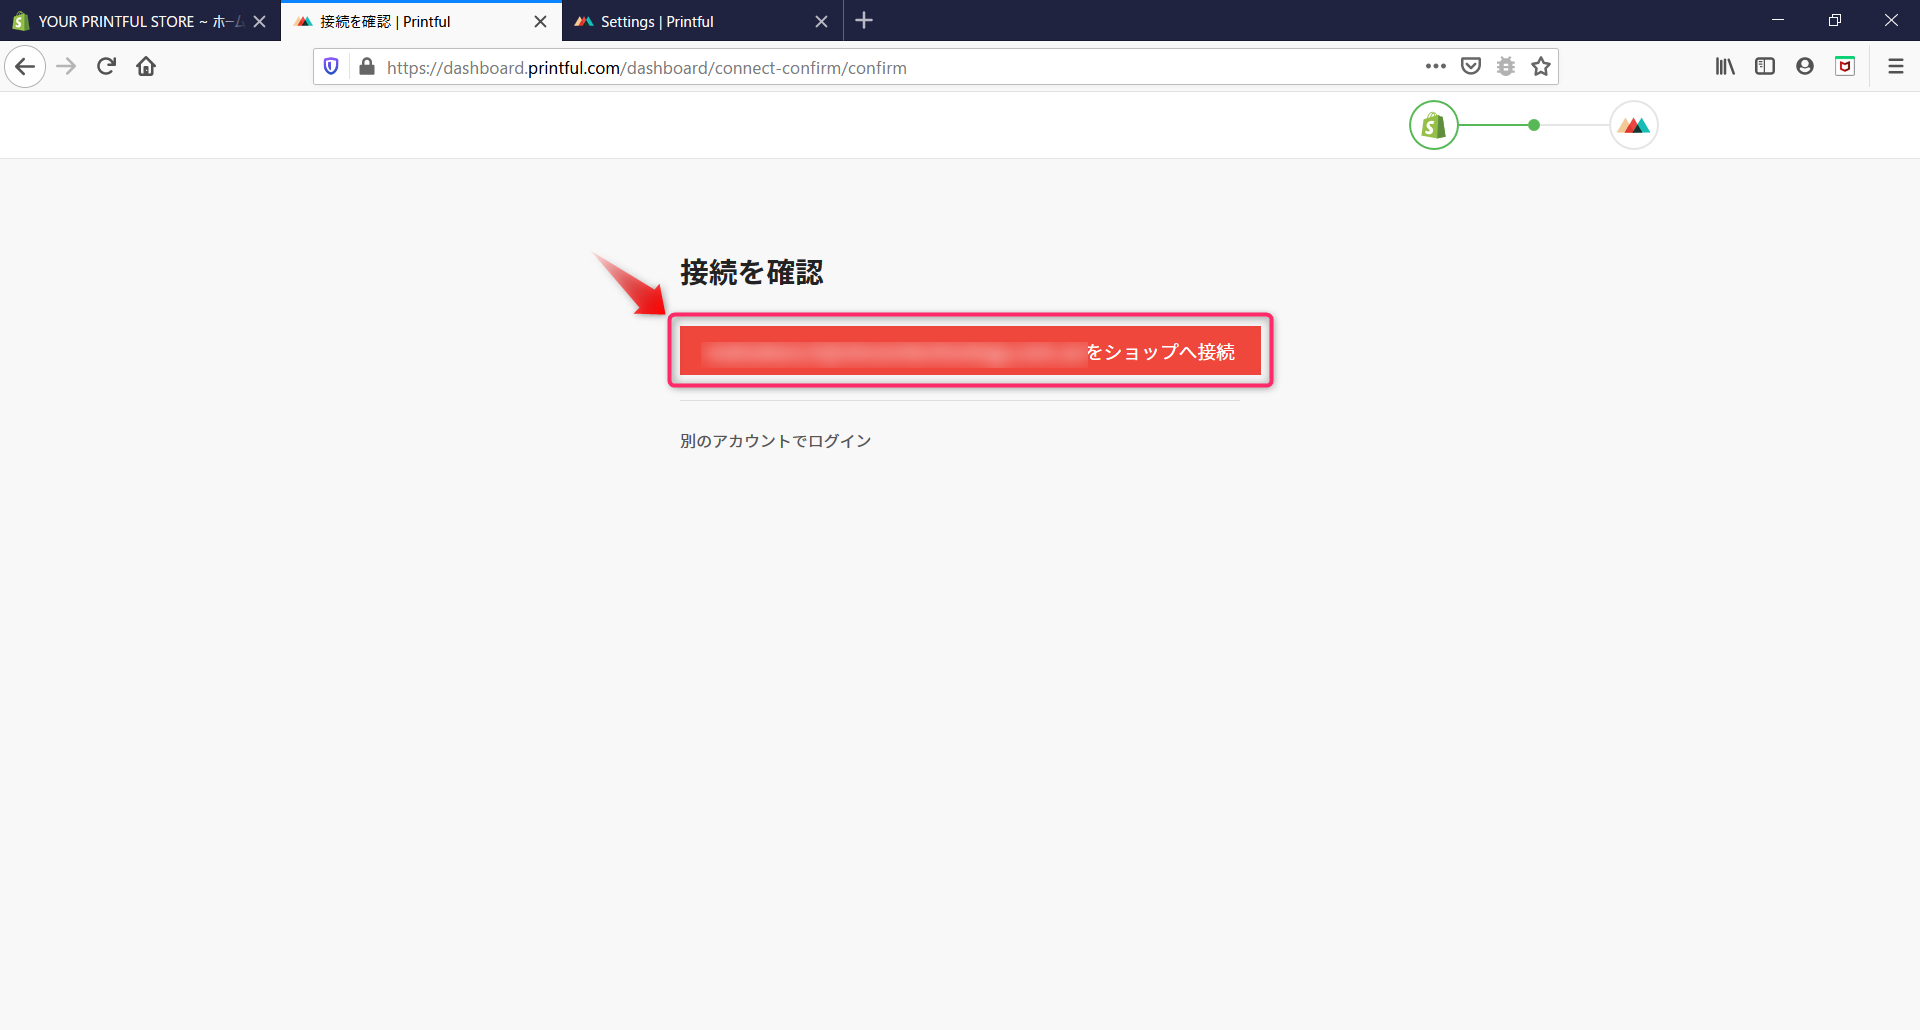
ショップへの接続ボタンを表示されますので、ボタンをクリックします。
![](https://blogdeoshiete.com/wp-content/uploads/2020-11-13_16h23_49.png)
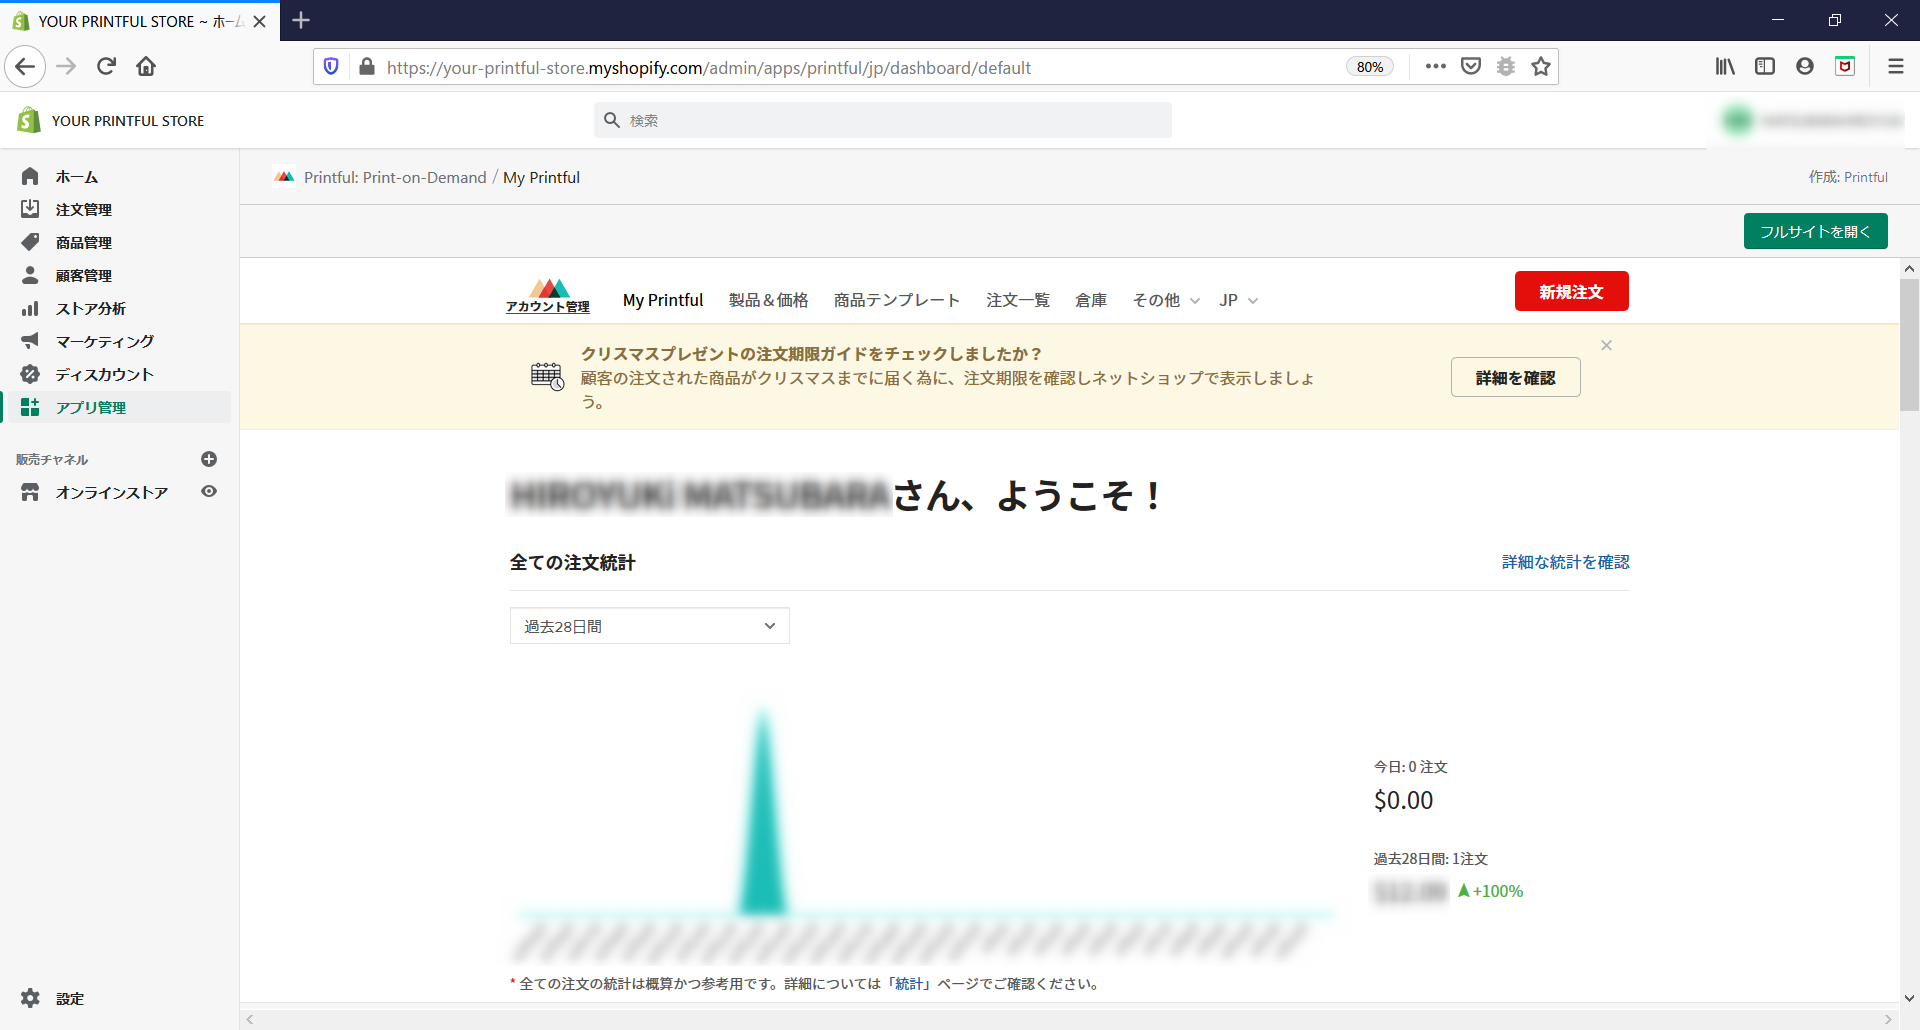
接続が正常に完了すると、ShopifyアドオンのPrintful画面に、Printful情報が表示されます。
![](https://blogdeoshiete.com/wp-content/uploads/2020-11-13_16h25_39.png)
Printfulでデザインした商品をShopifyストアにアップする
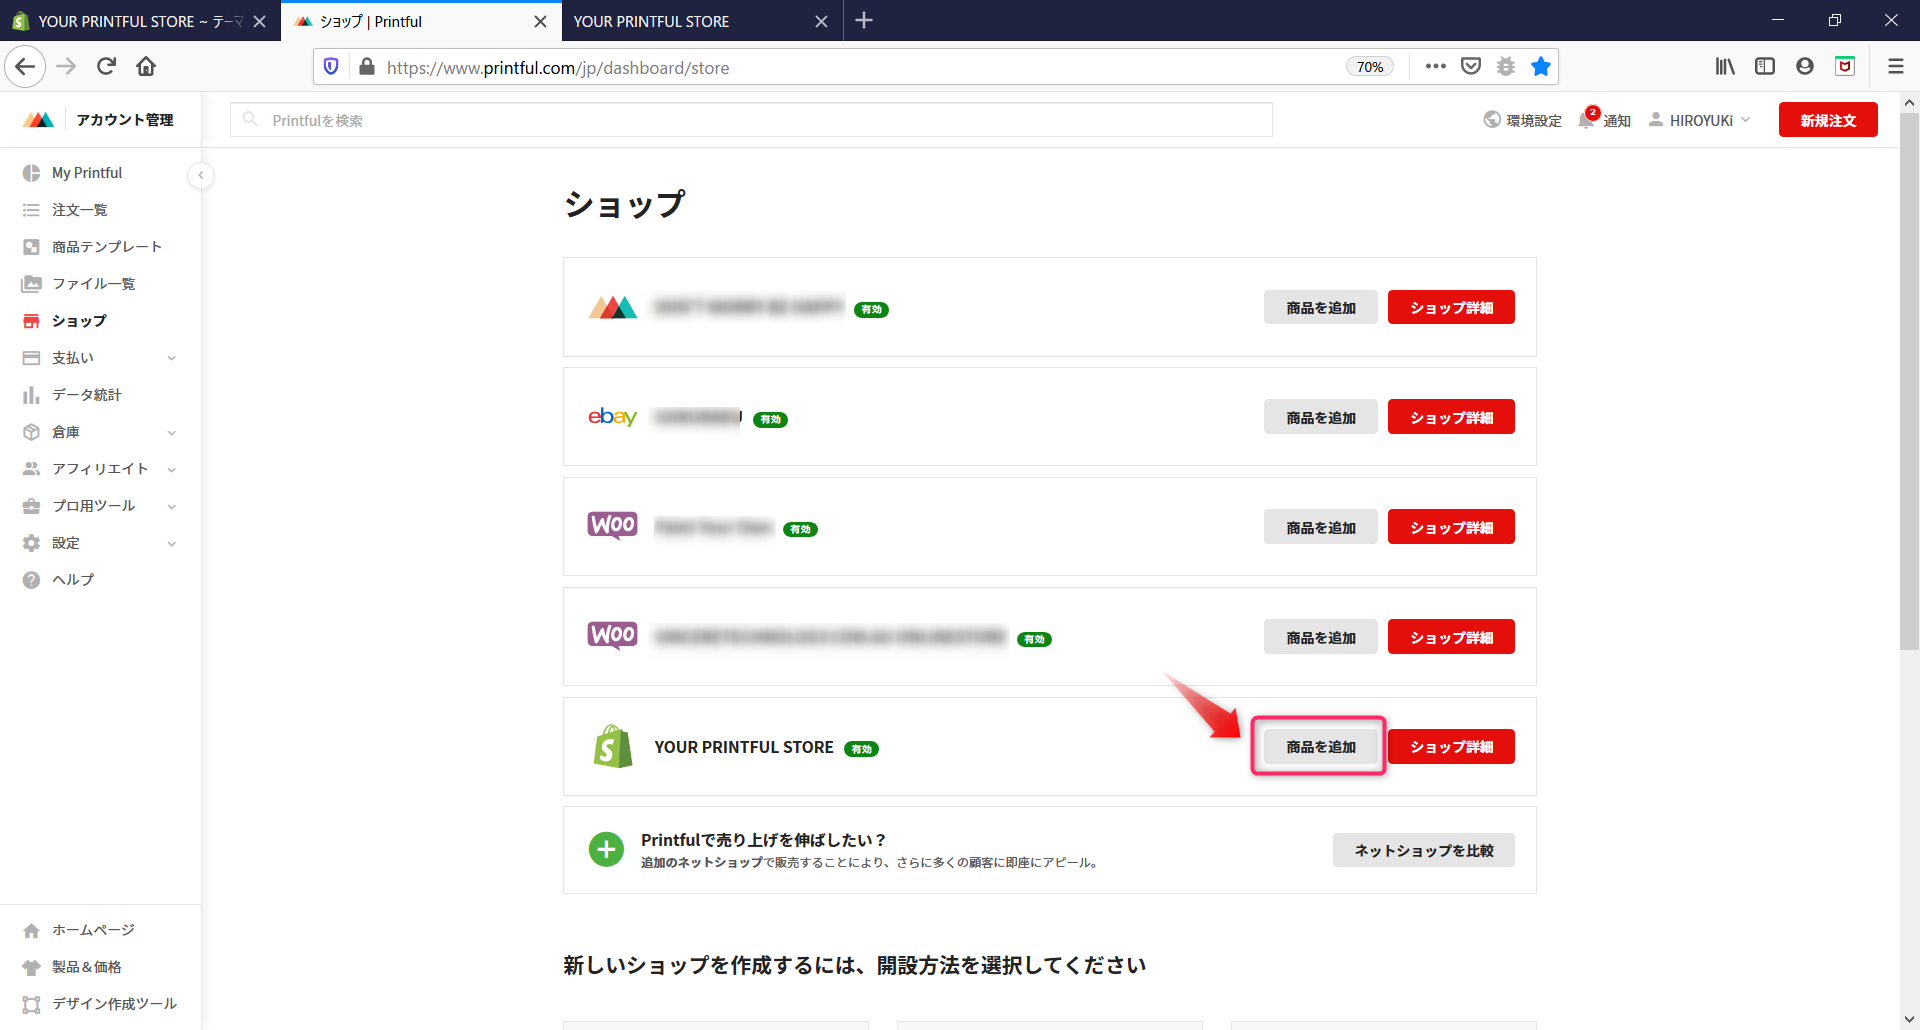
連携済みのECサイトが一覧表示されますので、先ほど登録したShopfyのショップの「商品を追加」ボタンをクリックします。
![](https://blogdeoshiete.com/wp-content/uploads/2020-11-13_16h28_13.png)
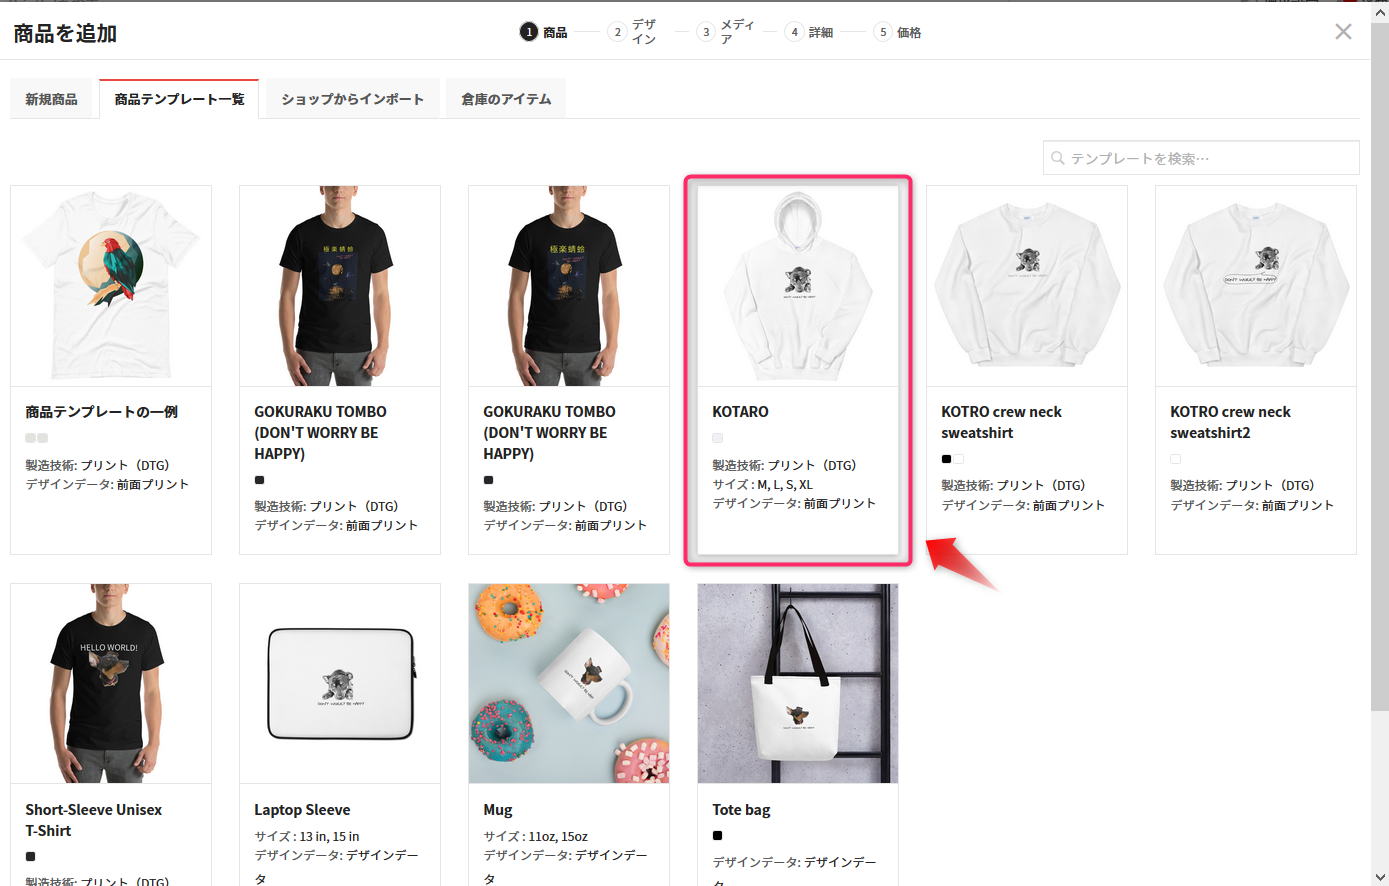
商品テンプレートからショップに追加したい商品テンプレートを選択します。
![](https://blogdeoshiete.com/wp-content/uploads/2020-11-13_16h28_57.png)
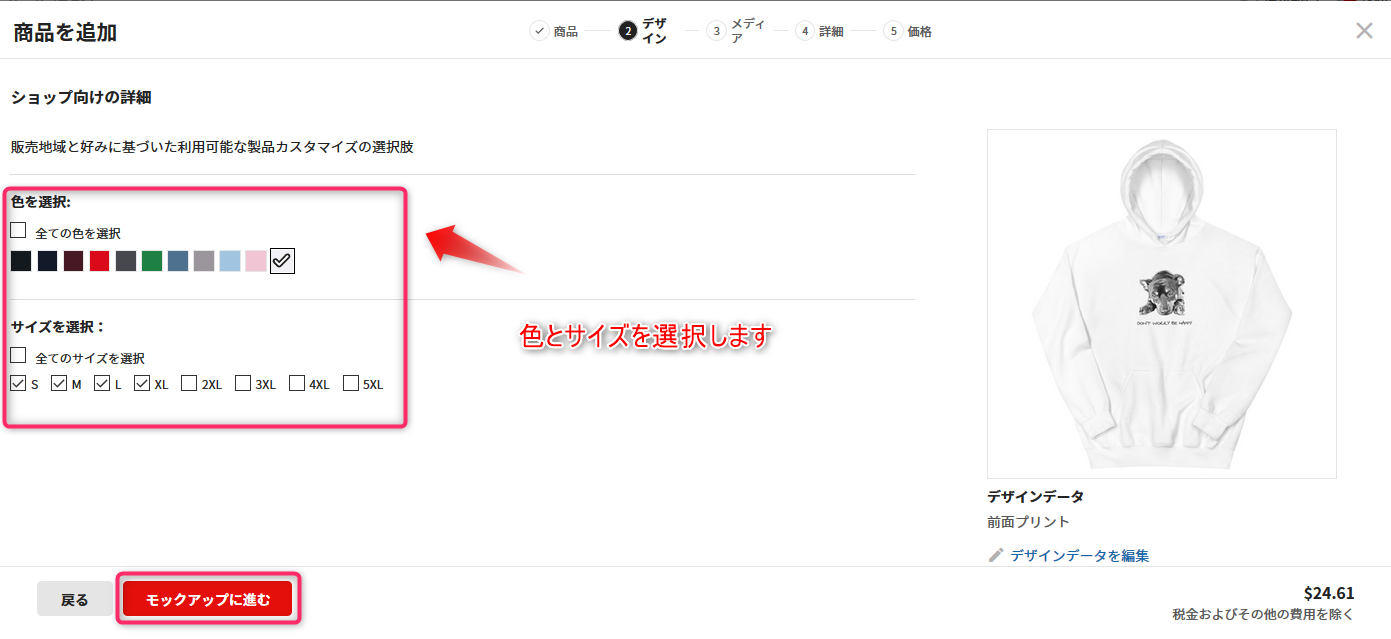
ショップに出品したい商品の色・サイズを指定します。
![](https://blogdeoshiete.com/wp-content/uploads/2020-11-13_16h29_16.png)
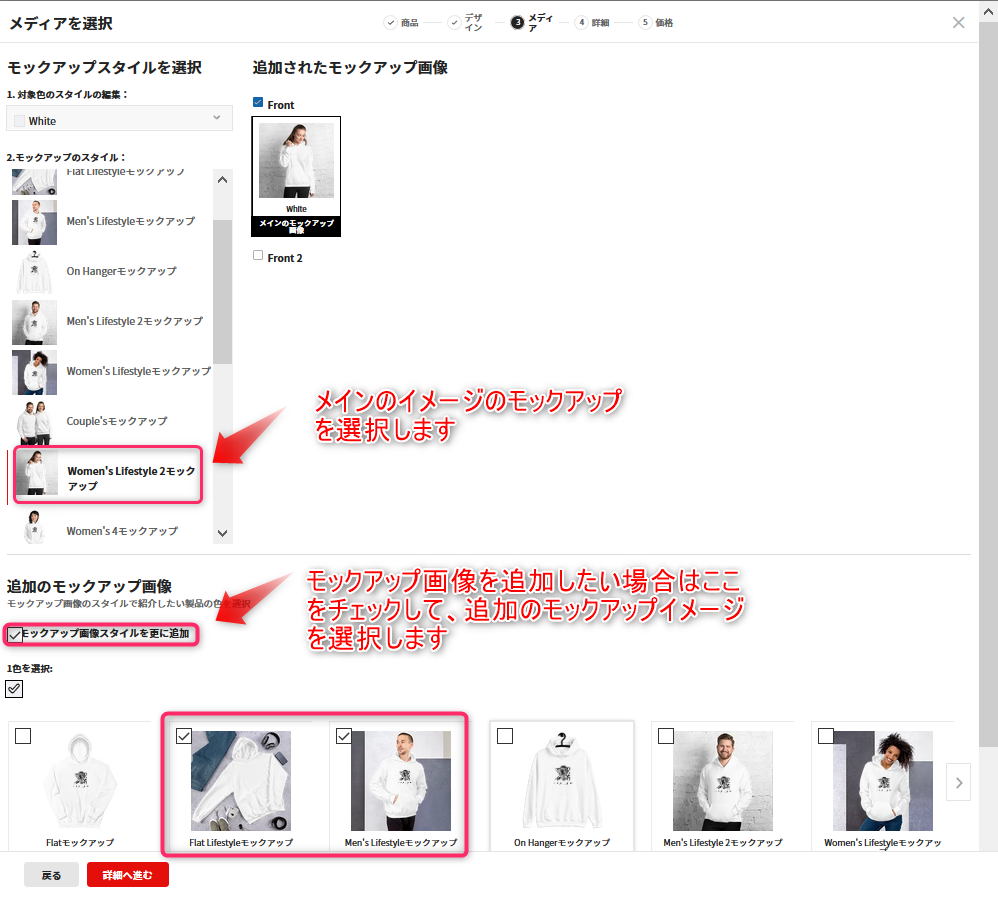
モップアップ画像を選択してモックアップイメージを作成します。
モップアップ画像を追加したい場合は、「モップアップ画像スタイル更に追加」にチェックを入れて、モックアップイメージを選択します。
![](https://blogdeoshiete.com/wp-content/uploads/2020-11-13_16h30_49.png)
商品のタイトルや説明、カテゴリーなど、その他詳細情報を設定します。
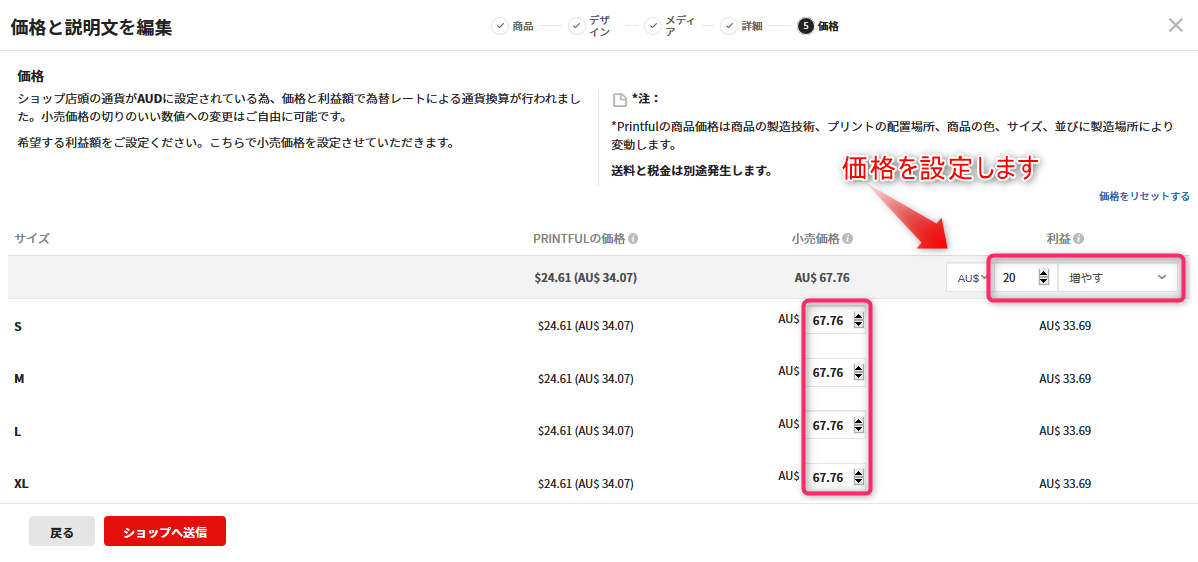
![](https://blogdeoshiete.com/wp-content/uploads/2020-11-13_16h31_16.png)
商品の価格を各サイズごとに設定します。
![](https://blogdeoshiete.com/wp-content/uploads/2020-11-13_16h31_36.png)
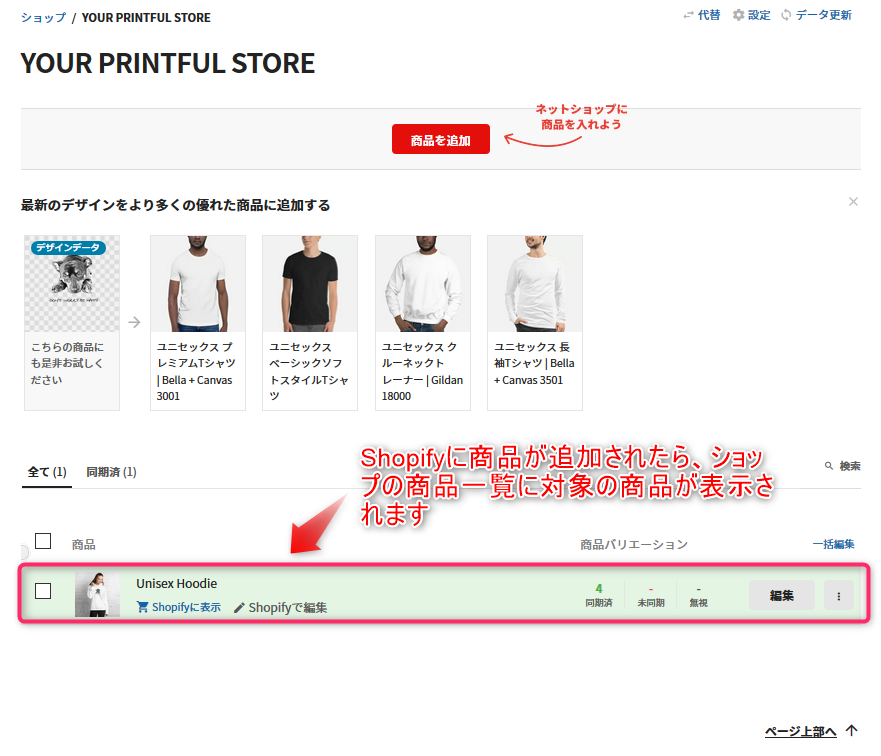
商品の価格を設定した後、「ショップへ送信」をクリックすると商品情報が、Shopifyに送信されます。送信が正しく完了すると、次のようにショップの商品一覧に先ほど作成した商品が追加されます。
![](https://blogdeoshiete.com/wp-content/uploads/2020-11-13_16h32_29.png)
まとめ
いかがでしたでしょうか。
Shopifyはカナダ発・世界最大のECサイト制作プラットフォームです。Shopifyを利用することでECサイトの構築に時間を取られることがなく、またサイトの管理もShopifyに任せられるため安心です。
本業で忙しくECサイトの立ち上げを躊躇しているあなたはShopifyなら簡単です。
ぜひ一度挑戦してみてください。
![](https://blogdeoshiete.com/wp-content/uploads/advertise.jpg)
この記事についてのご質問またはお困りのことがございましたら、お気軽にお問い合わせください。